Dell 2145cn User Guide - Page 36
Scanning, Scanning basics, Scanning from the control panel, Setting scan information in Dell Scan - driver
 |
View all Dell 2145cn manuals
Add to My Manuals
Save this manual to your list of manuals |
Page 36 highlights
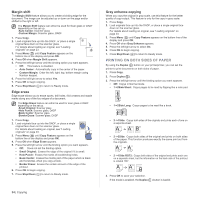
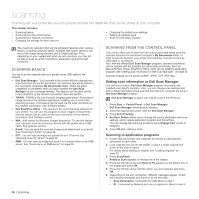
scanning Scanning with your printer lets you turn pictures and text into digital files that can be stored on your computer. This chapter includes: • Scanning basics • Scanning from the control panel • Scanning by a network connection • Changing the settings for each scan job • Changing the default scan settings • Setting up address book • Scan on both sides of paper The maximum resolution that can be achieved depends upon various factors, including computer speed, available disk space, memory, the size of the image being scanned, and bit depth settings. Thus, depending on your system and what you are scanning, you may not be able to scan at certain resolutions, especially using enhanced resolution. SCANNING BASICS You can scan the originals with your printer via an USB cable or the network. • Dell Scan Manager: You just walk to the printer with the originals and scan them from the control panel then, the scanned data will be stored in the connected computers My Documents folder. When the setup installation is completed, then you have installed the Dell Scan Manager on your computer already. This feature can be used via the local connection or the network connection. See next section. • TWAIN: TWAIN is the one of preset imaging applications. Scanning an image launches the selected application, enabling you to control the scanning process. This feature can be used via the local connection or the network connection. See Software section. • Dell SmarThru Office : This feature is the accompanying software for your printer. You can use this program to scan images or documents, and this feature can be used via the local connection or the network connection. See Software section. • WIA: WIA stands for Windows Images Acquisition. To use this feature your computer must be connected directly with the printer via an USB cable. See Software section. • Email: You can send the scanned image as an attachment to an email. See "Scanning to Email" on page 38. • FTP: You can scan an image and upload it to an FTP server. See "Scanning to an FTP server" on page 39. • SMB: You can scan an image and send it to a shared folder on an SMB server. See "Scanning to an SMB server" on page 39. SCANNING FROM THE CONTROL PANEL Your printer offers you to scan from the control panel and easily send the scanned document to connected computer's My Documents folder. In order to use this function, your printer and computer must be connect by USB cable or by network. Also, with the offered Dell Scan Manager program, scanned documents can be opened with the program you have setup previously. Such as Microsoft Paint, Email, SmarThru Office, OCR can be added to application program. See "Setting scan information in Dell Scan Manager." on page 36. Scanned images can be saved as BMP, JEPG, TIFF, PDF files. Setting scan information in Dell Scan Manager. You can find out about Dell Scan Manager program information and installed scan driver's condition. Also, you can change scan settings and add or delete the folders where scanned documents to computer are save in Dell Scan Manager program. Dell Scan Manager program can only be used in the Windows. 1. Press Start → Control Panel → Dell Scan Manager. Dell Scan Manager Administration appears. 2. Select the appropriate printer from the Dell Scan Manager. 3. Press Scan Property. 4. Set Scan Button allows you to change the saving destination and scan settings, add or delete application program and format files. You can change the scanning printer by using Change Port. (Local or Network) 5. Press OK after setting is done. Scanning to application programs 1. Ensure that your printer and computer are turned on and properly connected to each other. 2. Load originals face up into the DADF, or place a single original face down on the scanner glass. For details about loading an original, see "Loading originals" on page 23. 3. Press Scan/Email. Ready to Scan appears on the top line of the display. 4. Press the left/right arrow until Scan to PC appears on the bottom line of the display and press OK. 5. Press the left/right arrow until the option you want appears and press OK. 6. Depending on the port connection, different massages appear. Check the following messages and move on to the next step. • Scan Destination: Connected by USB. Move to step 7. • ID: Connected by Network and user is registered. Move to step 8. 36 | Scanning
-
 1
1 -
2
-
3
-
4
-
5
-
6
-
7
-
8
-
9
-
10
-
11
-
12
-
13
-
14
-
15
-
16
-
17
-
18
-
19
-
20
-
21
-
22
-
23
-
24
-
25
-
26
-
27
-
28
-
29
-
30
-
 31
31 -
 32
32 -
 33
33 -
 34
34 -
 35
35 -
 36
36 -
 37
37 -
 38
38 -
 39
39 -
 40
40 -
 41
41 -
42
-
43
-
44
-
45
-
46
-
47
-
48
-
49
-
50
-
51
-
52
-
53
-
54
-
55
-
56
-
57
-
58
-
59
-
60
-
61
-
62
-
63
-
64
-
65
-
66
-
67
-
68
-
69
-
70
-
71
-
72
-
73
-
74
-
75
-
76
-
77
-
78
-
79
-
80
-
81
-
82
-
83
-
84
-
85
-
86
-
87
-
88
-
89
-
90
-
91
-
92
-
93
-
94
-
95
-
96
-
97
-
98
-
99
-
100
-
101
-
102
-
103
-
104
-
105
-
106
-
107
-
108
-
109
-
110
-
111
-
112
-
113
-
114
-
115
-
116
-
117
-
118
-
119
-
120
-
121
-
122
-
123
-
124
-
125
-
126
-
127
-
128
-
129
-
130
-
131
-
132
-
133
-
134
-
135
-
136
-
137
-
138
-
139
-
140
-
141
 |
 |
