Dell 942 All In One Inkjet Printer Dell™ Photo All-In-One Printer 94 - Page 40
Scanning, Scanning Documents, Scanning Photos, Copy Now, Dell All-In-One Center, Send scanned image
 |
View all Dell 942 All In One Inkjet Printer manuals
Add to My Manuals
Save this manual to your list of manuals |
Page 40 highlights
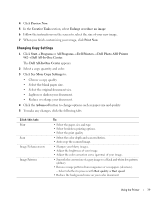
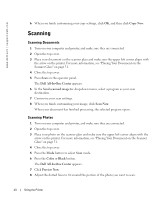
www.dell.com | support.dell.com 6 When you finish customizing your copy settings, click OK, and then click Copy Now. Scanning Scanning Documents 1 Turn on your computer and printer, and make sure they are connected. 2 Open the top cover. 3 Place your document on the scanner glass and make sure the upper left corner aligns with the arrow on the printer. For more information, see "Placing Your Document on the Scanner Glass" on page 31. 4 Close the top cover. 5 Press Scan on the operator panel. The Dell All-In-One Center appears. 6 In the Send scanned image to: drop-down menu, select a program as your scan destination. 7 Customize your scan settings. 8 When you finish customizing your image, click Scan Now. When your document has finished processing, the selected program opens. Scanning Photos 1 Turn on your computer and printer, and make sure they are connected. 2 Open the top cover. 3 Place your photo on the scanner glass and make sure the upper left corner aligns with the arrow on the printer. For more information, see "Placing Your Document on the Scanner Glass" on page 31. 4 Close the top cover. 5 Press the Mode button to select Scan mode. 6 Press the Color or Black button. The Dell All-In-One Center appears. 7 Click Preview Now. 8 Adjust the dotted lines to fit around the portion of the photo you want to scan. 40 Using the Printer
-
 1
1 -
2
-
3
-
4
-
5
-
6
-
7
-
8
-
9
-
10
-
11
-
12
-
13
-
14
-
15
-
16
-
17
-
18
-
19
-
20
-
21
-
22
-
23
-
24
-
25
-
26
-
27
-
28
-
29
-
30
-
31
-
32
-
33
-
34
-
 35
35 -
 36
36 -
 37
37 -
 38
38 -
 39
39 -
 40
40 -
 41
41 -
 42
42 -
 43
43 -
 44
44 -
 45
45 -
46
-
47
-
48
-
49
-
50
-
51
-
52
-
53
-
54
-
55
-
56
-
57
-
58
-
59
-
60
-
61
-
62
-
63
-
64
-
65
-
66
-
67
-
68
-
69
-
70
-
71
-
72
-
73
-
74
-
75
-
76
-
77
-
78
-
79
-
80
-
81
-
82
-
83
-
84
-
85
-
86
-
87
-
88
-
89
-
90
-
91
-
92
-
93
-
94
-
95
-
96
-
97
-
98
-
99
-
100
-
101
-
102
-
103
-
104
-
105
-
106
-
107
-
108
 |
 |
