Dell 942 All In One Inkjet Printer Dell™ Photo All-In-One Printer 94 - Page 71
Printer Problems - driver xp
 |
View all Dell 942 All In One Inkjet Printer manuals
Add to My Manuals
Save this manual to your list of manuals |
Page 71 highlights
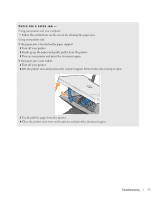
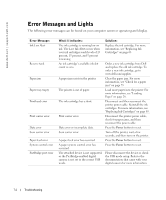
1 Click Start→ Programs or All Programs→ Dell Printers→ Dell Photo AIO Printer 942→ Uninstall Dell Photo AIO Printer 942. 2 Follow the instructions on the screen. 3 Restart your computer. 4 Insert the Drivers and Utilities CD, and then follow the instructions on the screen. If the installation screen does not appear: a In Windows XP, click Start→ My Computer. In Windows 2000, double-click My Computer from your desktop. b Double-click the CD-ROM drive icon. If necessary, double-click setup.exe. c When the printer software installation screen appears, click Install or Install Now. d Follow the instructions on your screen to complete the installation. Printer Problems ENSURE THAT THE PRINTER POWER CABLE IS FIRMLY CONNECTED TO THE PRINTER AND THE ELECTRICAL OUTLET DETERMINE IF THE PRINTER HAS BEEN HELD OR PAUSED - Windows XP 1 Click Start→ Settings→ Printers and Faxes. 2 Double-click Dell Photo AIO Printer 942, and then click Printer. 3 Make sure a check mark is not next to Pause Printing. If a check mark is next to Pause Printing, click it to deselect the option. Windows 2000 1 Click Start→ Settings→ Printers. 2 Double-click Dell Photo AIO Printer 942, and then click Printer. 3 Make sure a check mark is not next to Pause Printing. If a check mark is next to Pause Printing, click Pause Printing to deselect it. C H E C K F O R F L A S H I N G L I G HT S O N T H E P R I N T E R - For more information, see "Error Messages and Lights" on page 74 ENSURE YOU INSTALLED THE INK CARTRIDGES CORRECTLY AND REMOVED THE STICKER AND TAPE FROM EACH CARTRIDGE Troubleshooting 71
-
 1
1 -
2
-
3
-
4
-
5
-
6
-
7
-
8
-
9
-
10
-
11
-
12
-
13
-
14
-
15
-
16
-
17
-
18
-
19
-
20
-
21
-
22
-
23
-
24
-
25
-
26
-
27
-
28
-
29
-
30
-
31
-
32
-
33
-
34
-
35
-
36
-
37
-
38
-
39
-
40
-
41
-
42
-
43
-
44
-
45
-
46
-
47
-
48
-
49
-
50
-
51
-
52
-
53
-
54
-
55
-
56
-
57
-
58
-
59
-
60
-
61
-
62
-
63
-
64
-
65
-
 66
66 -
 67
67 -
 68
68 -
 69
69 -
 70
70 -
 71
71 -
 72
72 -
 73
73 -
 74
74 -
 75
75 -
 76
76 -
77
-
78
-
79
-
80
-
81
-
82
-
83
-
84
-
85
-
86
-
87
-
88
-
89
-
90
-
91
-
92
-
93
-
94
-
95
-
96
-
97
-
98
-
99
-
100
-
101
-
102
-
103
-
104
-
105
-
106
-
107
-
108
 |
 |