Dell 942 All In One Inkjet Printer Dell™ Photo All-In-One Printer 94 - Page 46
Faxing Electronic Documents, Receiving a Fax Using Fax Console or Fax Service Management
 |
View all Dell 942 All In One Inkjet Printer manuals
Add to My Manuals
Save this manual to your list of manuals |
Page 46 highlights
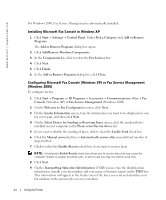
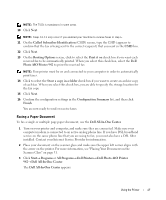
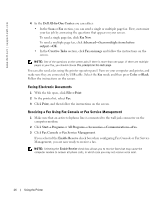
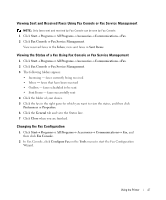
www.dell.com | support.dell.com 4 In the Dell All-In-One Center you can either: • In the Scan or Fax section, you can send a single or multiple page fax. First, customize your fax job by answering the questions that appear on your screen. To send a single page fax, click Fax Now. To send a multiple page fax, click Advanced→ Scan multiple items before output→ OK. • In the Creative Tasks section, click Fax an image and follow the instructions on the screen. NOTE: One of the questions on the screen asks if there is more than one page. If there are multiple pages in your fax, you should choose Yes, prompt me for each page. You can also send a fax using the printer operator panel. Turn on your computer and printer, and make sure they are connected by USB cable. Select the Fax mode and then press Color or Black. Follow the instructions on the screen. Faxing Electronic Documents 1 With the file open, click File→ Print. 2 In the printer list, select Fax. 3 Click Print, and then follow the instructions on the screen. Receiving a Fax Using Fax Console or Fax Service Management 1 Make sure that an active telephone line is connected to the wall jack connector on the computer modem. 2 Click Start→ Programs or All Programs→ Accessories→ Communications→ Fax. 3 Click Fax Console or Fax Service Management. If you selected the Enable Receive check box when configuring Fax Console or Fax Service Management, you are now ready to receive a fax. NOTE: Selecting the Enable Receive check box allows you to receive faxes but may cause the computer modem to answer all phone calls, in which case you may not receive voice mail. 46 Using the Printer
-
 1
1 -
2
-
3
-
4
-
5
-
6
-
7
-
8
-
9
-
10
-
11
-
12
-
13
-
14
-
15
-
16
-
17
-
18
-
19
-
20
-
21
-
22
-
23
-
24
-
25
-
26
-
27
-
28
-
29
-
30
-
31
-
32
-
33
-
34
-
35
-
36
-
37
-
38
-
39
-
40
-
 41
41 -
 42
42 -
 43
43 -
 44
44 -
 45
45 -
 46
46 -
 47
47 -
 48
48 -
 49
49 -
 50
50 -
 51
51 -
52
-
53
-
54
-
55
-
56
-
57
-
58
-
59
-
60
-
61
-
62
-
63
-
64
-
65
-
66
-
67
-
68
-
69
-
70
-
71
-
72
-
73
-
74
-
75
-
76
-
77
-
78
-
79
-
80
-
81
-
82
-
83
-
84
-
85
-
86
-
87
-
88
-
89
-
90
-
91
-
92
-
93
-
94
-
95
-
96
-
97
-
98
-
99
-
100
-
101
-
102
-
103
-
104
-
105
-
106
-
107
-
108
 |
 |