Dell Axim X5 User's Guide - Page 107
Creating a Modem Connection - advanced
 |
View all Dell Axim X5 manuals
Add to My Manuals
Save this manual to your list of manuals |
Page 107 highlights
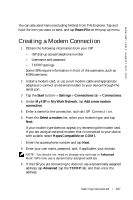
www.dell.com | support.dell.com You can also send items (excluding folders) from File Explorer. Tap and hold the item you want to send, and tap Beam File on the pop-up menu. Creating a Modem Connection 1 Obtain the following information from your ISP: - ISP dial-up access telephone number - Username and password - TCP/IP settings Some ISPs require information in front of the username, such as MSN/username. 2 Install a modem card, or use a null modem cable and appropriate adapters to connect an external modem to your device through the serial port. 3 Tap the Start button→ Settings→ Connections tab→ Connections. 4 Under My ISP or My Work Network, tap Add a new modem connection. 5 Enter a name for the connection, such as ISP Connection. 6 From the Select a modem list, select your modem type, and tap Next. If your modem type does not appear, try reinserting the modem card. If you are using an external modem that is connected to your device with a cable, select Hayes Compatible on COM1. 7 Enter the access phone number and tap Next. 8 Enter your user name, password, and, if applicable, your domain. NOTE: You should not need to change any settings in Advanced. Most ISPs now use a dynamically assigned address. 9 If the ISP you are connecting to does not use a dynamically assigned address, tap Advanced, tap the TCP/IP tab, and then enter the address. Getting Connected 107
-
 1
1 -
2
-
3
-
4
-
5
-
6
-
7
-
8
-
9
-
10
-
11
-
12
-
13
-
14
-
15
-
16
-
17
-
18
-
19
-
20
-
21
-
22
-
23
-
24
-
25
-
26
-
27
-
28
-
29
-
30
-
31
-
32
-
33
-
34
-
35
-
36
-
37
-
38
-
39
-
40
-
41
-
42
-
43
-
44
-
45
-
46
-
47
-
48
-
49
-
50
-
51
-
52
-
53
-
54
-
55
-
56
-
57
-
58
-
59
-
60
-
61
-
62
-
63
-
64
-
65
-
66
-
67
-
68
-
69
-
70
-
71
-
72
-
73
-
74
-
75
-
76
-
77
-
78
-
79
-
80
-
81
-
82
-
83
-
84
-
85
-
86
-
87
-
88
-
89
-
90
-
91
-
92
-
93
-
94
-
95
-
96
-
97
-
98
-
99
-
100
-
101
-
 102
102 -
 103
103 -
 104
104 -
 105
105 -
 106
106 -
 107
107 -
 108
108 -
 109
109 -
 110
110 -
 111
111 -
 112
112 -
113
-
114
-
115
-
116
-
117
-
118
-
119
-
120
-
121
-
122
-
123
-
124
-
125
-
126
-
127
-
128
-
129
-
130
-
131
-
132
-
133
-
134
-
135
-
136
-
137
-
138
-
139
-
140
-
141
-
142
-
143
-
144
-
145
-
146
-
147
-
148
-
149
-
150
-
151
-
152
-
153
-
154
-
155
-
156
-
157
-
158
-
159
-
160
-
161
-
162
-
163
-
164
-
165
-
166
-
167
-
168
-
169
-
170
 |
 |
