Dell B3465dnf Mono Smart Access Card Solution Administrators Guide - Page 17
Configuring the address book
 |
View all Dell B3465dnf Mono manuals
Add to My Manuals
Save this manual to your list of manuals |
Page 17 highlights
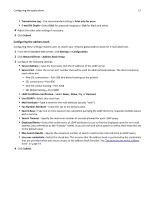
Configuring the applications 17 • Transmission Log-The recommended setting is Print only for error. • E-mail Bit Depth-Select 8 bit for grayscale imaging or 1 bit for black and white. 4 Adjust the other scan settings if necessary. 5 Click Submit. Configuring the address book Configuring these settings enables users to search your network global address book for e-mail addresses. 1 From the Embedded Web Server, click Settings or Configuration. 2 Click Network/Ports > Address Book Setup. 3 Configure the following settings: • Server Address-Type the host name (not the IP address) of the LDAP server. • Server Port-Enter the server port number that will be used for address book lookups. The most commonly used values are: - Non‑SSL connections-Port 389 (the default setting on the printer) - SSL connections-Port 636 - Non‑SSL Global Catalog-Port 3268 - SSL Global Catalog-Port 3269 • LDAP Certificate Verification-Select Never, Allow, Try, or Demand. • Use GSSAPI-Select this check box. • Mail Attribute-Type a name for the mail attribute (usually "mail"). • Fax Number Attribute-Leave this set to the default value. • Search Base-Type one or more values to be used when querying the LDAP directory. Separate multiple values with a comma. • Search Timeout-Specify the maximum number of seconds allowed for each LDAP query. • Displayed Name-Select the combination of LDAP attributes to use to find the displayed name for an e-mail address (also referred to as the "friendly" name). If you are not sure which option to select, then leave this set to the default value. • Max Search Results-Specify the maximum number of search results to be returned from an LDAP query. • Use user credentials-Select this check box. This ensures that the address book is protected by the credentials that are provided when you secure access to the address book function. See "Securing access to the address book" on page 19. 4 Click Submit.
-
 1
1 -
2
-
3
-
4
-
5
-
6
-
7
-
8
-
9
-
10
-
11
-
 12
12 -
 13
13 -
 14
14 -
 15
15 -
 16
16 -
 17
17 -
 18
18 -
 19
19 -
 20
20 -
 21
21 -
 22
22 -
23
-
24
-
25
-
26
-
27
-
28
-
29
-
30
-
31
-
32
-
33
-
34
-
35
-
36
-
37
-
38
-
39
-
40
-
41
-
42
-
43
-
44
-
45
-
46
-
47
-
48
-
49
-
50
-
51
-
52
 |
 |
