Dell B3465dnf Mono Smart Access Card Solution Administrators Guide - Page 5
Configuring printer settings for use with the applications
 |
View all Dell B3465dnf Mono manuals
Add to My Manuals
Save this manual to your list of manuals |
Page 5 highlights
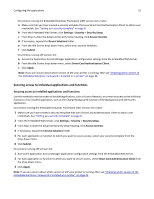
Configuring the applications 5 Configuring the applications Configuring printer settings for use with the applications Even if the printer has been set up previously, make sure all settings have been configured to enable the security features of each application to work correctly. Changing the panel login timeout To help prevent unauthorized access if a user leaves the printer unattended with a Smart Card inserted or while logged in, you can limit the amount of time a user stays logged in without activity. If the user does not touch the screen within the specified time, then the session ends and the user is logged out, even if a Smart Card is still inserted. 1 From the Embedded Web Server, click Settings or Configuration. 2 Click Security > Miscellaneous Security Settings > Login Restrictions. 3 Set the Panel Login Timeout value (in seconds). The recommended value is 30 seconds. 4 Click Submit. Installing certificates manually Note: In select printer models, you can automatically download the CA. For more information, see "Installing certificates automatically" on page 6. Before configuring Kerberos or domain controller settings, you must install the appropriate certificates on the printer. At minimum, you must install the certificate of the Certificate Authority (CA) that issued the domain controller certificate. The CA certificate is used for domain controller validation. Additional certificates can be installed if needed. For example, if you plan to use chain validation to validate the domain controller certificate, then you must install the entire certificate chain. Each certificate must be in a separate PEM (.cer) file. For each certificate you want to install, do the following: 1 From the Embedded Web Server, click Settings or Configuration. 2 Click Security > Certificate Management > Certificate Authority Management > New. 3 Upload the file containing the certificate, and then click Submit. Note: The file must be in PEM (.cer) format. The contents of the file should resemble the following: -----BEGIN CERTIFICATE----MIIE1jCCA76gAwIBAgIQY6sV0KL3tIhBtlr4gHG85zANBgkqhkiG9w0BAQUFADBs ... l3DTbPe0mnIbTq0iWqKEaVne1vvaDt52iSpEQyevwgUcHD16rFy+sOnCaQ== -----END CERTIFICATE-----
-
 1
1 -
 2
2 -
 3
3 -
 4
4 -
 5
5 -
 6
6 -
 7
7 -
 8
8 -
 9
9 -
 10
10 -
 11
11 -
12
-
13
-
14
-
15
-
16
-
17
-
18
-
19
-
20
-
21
-
22
-
23
-
24
-
25
-
26
-
27
-
28
-
29
-
30
-
31
-
32
-
33
-
34
-
35
-
36
-
37
-
38
-
39
-
40
-
41
-
42
-
43
-
44
-
45
-
46
-
47
-
48
-
49
-
50
-
51
-
52
 |
 |
