Dell Brocade 815 Brocade Adapters Installation and Reference Manual - Page 108
all DCHOSEN_INSTALL_SET values DRIVER, GUI, or BOTH., C:\Program Files\BROCADE\Adapter
 |
View all Dell Brocade 815 manuals
Add to My Manuals
Save this manual to your list of manuals |
Page 108 highlights
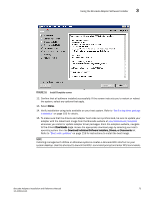
3 Using the Brocade Adapter Software Installer • Select Download ISO Image and download an ISO 9660 (.iso) optical disk image. This contains the Brocade Adapter Software Installer, individual driver packages containing installer scripts, HCM, and documentation. You can use this ISO file to create a CD that you can carry to your system for installation. • To enter these commands, first change to the directory where the adapter software is installed (cd ). Default install directories are the following; - Windows systems C:\Program Files\BROCADE\Adapter - Linux and Solaris systems /opt/brocade/adapter • On Windows XP, Vista, NT, 2000, and Windows 2003 service pack1, only the GUI will install for all DCHOSEN_INSTALL_SET values (DRIVER, GUI, or BOTH). • To launch the installer in silent mode, you must use and provide values for the following parameters: - DCHOSEN_INSTALL_SET - -i silent • By default, the initrd file will backed up automatically during Linux installations. During installation, a dialog box displays with the location of the file. If a file exists, a dialog box displays with its current location and allows you to overwrite the file, not overwrite the file, or quit. • To make sure that the drivers and adapter boot code are synchronized, be sure to update your adapter with the latest boot image from after you install or update adapter driver packages. using the following steps. a. Go to the adapters website at www.brocade.com/adapters. b. Navigate to the Downloads page. c. Select your operating system from the Downloads list. d. Download the boot code image from the "Boot Code" area. Refer to "Boot code updates" on page 118 for instructions to install the boot code image. • Installing management utilities on Windows systems creates a Brocade BCU desktop shortcut on your system desktop. Use this to launch the BCU> command prompt and enter BCU commands. If installation fails (possibly devices are not present on the system), the shortcut is still created. The BCU shortcut provides quick access to the installation folder where you can perform the following tasks: - Run the Support Save feature - Reinstall drivers - Run adapter utilities NOTE Launching BCU on Windows systems through methods other than through the desktop shortcut is not recommended and may result in display of inconsistent information. • Because the ESX 5.0 driver installation process does not enforce maintenance mode, it is recommended that you put the host in maintenance mode since a system reboot is required after installation. 80 Brocade Adapters Installation and Reference Manual 53-1002144-01
-
 1
1 -
2
-
3
-
4
-
5
-
6
-
7
-
8
-
9
-
10
-
11
-
12
-
13
-
14
-
15
-
16
-
17
-
18
-
19
-
20
-
21
-
22
-
23
-
24
-
25
-
26
-
27
-
28
-
29
-
30
-
31
-
32
-
33
-
34
-
35
-
36
-
37
-
38
-
39
-
40
-
41
-
42
-
43
-
44
-
45
-
46
-
47
-
48
-
49
-
50
-
51
-
52
-
53
-
54
-
55
-
56
-
57
-
58
-
59
-
60
-
61
-
62
-
63
-
64
-
65
-
66
-
67
-
68
-
69
-
70
-
71
-
72
-
73
-
74
-
75
-
76
-
77
-
78
-
79
-
80
-
81
-
82
-
83
-
84
-
85
-
86
-
87
-
88
-
89
-
90
-
91
-
92
-
93
-
94
-
95
-
96
-
97
-
98
-
99
-
100
-
101
-
102
-
 103
103 -
 104
104 -
 105
105 -
 106
106 -
 107
107 -
 108
108 -
 109
109 -
 110
110 -
 111
111 -
 112
112 -
 113
113 -
114
-
115
-
116
-
117
-
118
-
119
-
120
-
121
-
122
-
123
-
124
-
125
-
126
-
127
-
128
-
129
-
130
-
131
-
132
-
133
-
134
-
135
-
136
-
137
-
138
-
139
-
140
-
141
-
142
-
143
-
144
-
145
-
146
-
147
-
148
-
149
-
150
-
151
-
152
-
153
-
154
-
155
-
156
-
157
-
158
-
159
-
160
-
161
-
162
-
163
-
164
-
165
-
166
-
167
-
168
-
169
-
170
-
171
-
172
-
173
-
174
-
175
-
176
-
177
-
178
-
179
-
180
-
181
-
182
-
183
-
184
-
185
-
186
-
187
-
188
-
189
-
190
-
191
-
192
-
193
-
194
-
195
-
196
-
197
-
198
-
199
-
200
-
201
-
202
-
203
-
204
-
205
-
206
-
207
-
208
-
209
-
210
-
211
-
212
-
213
-
214
-
215
-
216
-
217
-
218
-
219
-
220
-
221
-
222
-
223
-
224
-
225
-
226
-
227
-
228
-
229
-
230
-
231
-
232
-
233
-
234
-
235
-
236
-
237
-
238
-
239
-
240
-
241
-
242
-
243
-
244
-
245
-
246
-
247
-
248
-
249
-
250
-
251
-
252
-
253
-
254
-
255
-
256
-
257
-
258
-
259
-
260
-
261
-
262
-
263
-
264
-
265
-
266
-
267
-
268
-
269
-
270
-
271
-
272
 |
 |
