Dell EqualLogic PS6210S EqualLogic Auto-Snapshot Manager/Microsoft Edition Ver - Page 55
Mount Smart Copies, Prerequisites for Mounting Smart Copies, Mount a Snapshot or Clone Smart Copy
 |
View all Dell EqualLogic PS6210S manuals
Add to My Manuals
Save this manual to your list of manuals |
Page 55 highlights
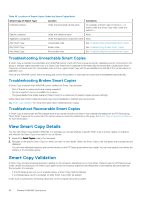
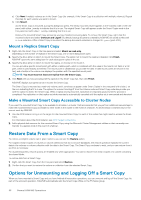
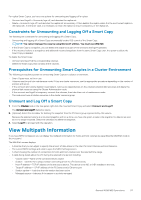
Options for accessing data include: • Quickly restore the original object from a Smart Copy-Applies to Smart Copies that contain volume snapshots or database snapshots. • Restore a portion of the original object from a Smart Copy-Applies to Smart Copies that contain database snapshots. • Mount a Smart Copy as read-only-Applies to replicas, or Smart Copies that contain replicas of volumes or databases. • Clone any replica and then mount the clone. Replication is not disrupted-Applies to any replica. • Restore the original object in a new location-Applies to Smart Copies that contain database snapshots and database clones. • Clone and restore the original object in a new location-Applies to Smart Copies that contain database replicas. If you make changes to a volume layout, and you have a Smart Copy that predates the layout changes, you cannot use that Smart Copy to recover data. Attempting to recover the data might cause data loss on the production volume. You can mount or restore data from a Smart Copy of a volume that contained mount points at the time that you created the Smart Copy. However, the restored mount points always references the same volumes that they referenced at the point in time when you created the Smart Copy. You must manually change the restored mount points if you want them to reference different volumes, such as another mounted Smart Copy. Mount Smart Copies Mounting a Smart Copy makes its contents accessible to the computer. If you are restoring certain files or a subset of files contained within a Smart Copy, you need to mount it first. After a Smart Copy is mounted, you can use it to access the data you want to restore. The Mount option supports both Windows drive letters and mount points. • A mount point is an empty folder on an existing NTFS or ReFS file system that serves as an access point for a new mounted file system. Use the Mount option to access the data in a snapshot or clone Smart Copy created from volumes or application components. • When you mount a Smart Copy, ASM/ME opens the Select Volume Label dialog box for every object in the Smart Copy. This dialog allows you to specify either a drive letter or a mount point on which to mount the snapshot or clone. • If you take a Smart Copy of a collection that contains three volumes and then decide to mount the Smart Copy, the Select Volume Label dialog box opens three times so that you can specify a mount point or drive letter for each of the volumes. • You can choose not to mount a certain volume, but you must mount at least one volume in the Smart Copy. • After a snapshot or clone volume has been mounted, you can copy data from it. The mounted volume appears under the Volumes node in the tree panel, as a disk with an assigned drive letter or mount point next to it. • As part of the mount operation, ASM/ME automatically sets the Smart Copy online on the PS Series group. Prerequisites for Mounting Smart Copies Before performing the procedure for mounting a Smart Copy, you must meet the following prerequisites: • Ensure that the computer has the security credentials to access the Smart Copies in the set. If CHAP is used to restrict computer access to Smart Copies in the group, but the credentials are not stored on the computer, a dialog box opens, prompting you for the user name and password. See Smart Copy Access for more information about automatically supplying the CHAP credentials. • Identify the snapshot or Smart Copy to mount. • Choose the drive letters or mount points to use. If you intend to use a mount point, you can create an empty NTFS folder, ReFS folder, or you can use the Browse button to navigate to a location where you can create a new folder before performing these steps. Mount a Snapshot or Clone Smart Copy 1. Right-click a Smart Copy in the tree panel and select Mount, then click Next. The Mount Smart Copy wizard starts. In the Mount folder root field, the default mount location is displayed. 2. To change the default mount location, click Browse, and navigate to the location where you want to mount the Smart Copy. The panel displays the original volume from which the Smart Copy was created, the original host, and the checkboxes for selecting whether to mount the Smart Copy (checked by default) or whether to mount it as read-only (also checked by default, and a dropdown list enabling you to select a drive letter on which to mount the Smart Copy. 3. Provide a specific mount point with either a relative path, which is combined with the value in the mount root field, or a full path, which is used exactly as specified. The mount point is validated as you specify the data. Invalid mount points are shown in red text, and a tooltip in the volume row displays the problem with the specified mount point. 4. Use one of the following methods to select the volume label: General ASM/ME Operations 55
-
 1
1 -
2
-
3
-
4
-
5
-
6
-
7
-
8
-
9
-
10
-
11
-
12
-
13
-
14
-
15
-
16
-
17
-
18
-
19
-
20
-
21
-
22
-
23
-
24
-
25
-
26
-
27
-
28
-
29
-
30
-
31
-
32
-
33
-
34
-
35
-
36
-
37
-
38
-
39
-
40
-
41
-
42
-
43
-
44
-
45
-
46
-
47
-
48
-
49
-
 50
50 -
 51
51 -
 52
52 -
 53
53 -
 54
54 -
 55
55 -
 56
56 -
 57
57 -
 58
58 -
 59
59 -
 60
60 -
61
-
62
-
63
-
64
-
65
-
66
-
67
-
68
-
69
-
70
-
71
-
72
-
73
-
74
-
75
-
76
-
77
-
78
-
79
-
80
-
81
-
82
-
83
-
84
-
85
-
86
-
87
-
88
-
89
-
90
-
91
-
92
-
93
-
94
-
95
-
96
-
97
-
98
-
99
-
100
-
101
-
102
-
103
-
104
-
105
-
106
-
107
-
108
-
109
-
110
-
111
-
112
-
113
-
114
-
115
-
116
-
117
-
118
-
119
-
120
-
121
-
122
-
123
-
124
-
125
-
126
-
127
-
128
-
129
-
130
-
131
-
132
-
133
-
134
 |
 |
