Dell EqualLogic PS6210S EqualLogic Auto-Snapshot Manager/Microsoft Edition Ver - Page 65
Con a Verification Server, View Checksum Verification and Soft Recovery Status
 |
View all Dell EqualLogic PS6210S manuals
Add to My Manuals
Save this manual to your list of manuals |
Page 65 highlights
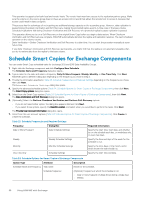
• The verification server and any servers that created the Smart Copies are part of the same Windows domain. • The verification server and any servers that created the Smart Copies are able to access a shared location for Smart Copies. • Network access and bandwidth are available to process the Global Verification tasks of client computers. • A UNC or shared location exists. Configure a Verification Server You must ensure that the Exchange utility that performs the Checksum Verification and Soft Recovery tasks is installed on whatever host you are configuring as a verification server. If you installed Exchange on the server, then this installation is taken care of for you. However, a full Exchange installation is not needed for a host to be a verification server. NOTE: Dell recommends that the verification server not be an Exchange Server so as to not affect mail services. If the servers are the same, you must manually copy the eseutil.exe and ese.dll files to the verification server. 1. Start the Remote Setup Wizard to enable the verification server to access the PS Series group. 2. Find the location of the shared Smart Copy folder on the creator server. 3. Launch ASM/ME and click Settings in the navigation area. a) Click General Settings. b) Find the path specified for the Auto-Snapshot Manager Document Directory. In a DAG path, this is the UNC path. c) Copy the path to a text file or write it down. 4. Configure the volume access control records on the PS Series group as follows: • For snapshot Smart Copies, the host must have access to the volume and its snapshots. • For clone Smart Copies, the host must have access to the volume. • For replica Smart Copies, the host must have access to the replication partner, where the replica sets are stored. Also make sure that the original volume (on the primary group) is not accessible by the verifier host. For more detailed information, see the Creating Access Control Records procedure in the Group Manager GUI online help. See also Checksum Verification and Soft Recovery for Replicas. 5. Map a drive on the verification server to the shared Smart Copy folder that you identified in Step 2. Use the same drive letter if possible. 6. Point ASM/ME to the shared Smart Copy folder on the verification server. 7. Launch ASM/ME and click Settings in the navigation area. a) Click General Settings. b) Specify the path to the shared folder that you defined in step 2. Make sure that the drive letter specifies the local mount point. c) Click Save to update the properties. ASM/ME finds the Smart Copies on the creator server and updates the tree panel. Because these Smart Copies are not found on the local computer, ASM/ME displays a blue question mark icon on the node. 8. Set up a Global Verification task on the verification server, using the procedure described in Schedule a Global Verification Task for Checksum Verification and Soft Recovery. 9. Perform the following steps: a) Select the Process Smart Copies created by another host option. b) Consider setting the Global Verification window to the maximum possible 24-hour period if the sole purpose of the verification server is Checksum Verification and Soft Recovery. c) Specify a user account that has appropriate permission to access the Smart Copies (according to the shared folder settings). The verification server now watches the shared folder and processes any unverified Smart Copies according to its Global Verification window. When you select a Smart Copy, its verification status is listed in its properties. View Checksum Verification and Soft Recovery Status 1. Expand the Smart Copy node until an Exchange Smart Copy (indicated by the gray camera icon) is visible. 2. Select a Smart Copy node (indicated by the gray camera icon) and view its properties. If the status is successful, ASM/ME displays Successfully Verified and Successful for Checksum Verification and Soft Recovery status, respectively. Using ASM/ME with Exchange 65
-
 1
1 -
2
-
3
-
4
-
5
-
6
-
7
-
8
-
9
-
10
-
11
-
12
-
13
-
14
-
15
-
16
-
17
-
18
-
19
-
20
-
21
-
22
-
23
-
24
-
25
-
26
-
27
-
28
-
29
-
30
-
31
-
32
-
33
-
34
-
35
-
36
-
37
-
38
-
39
-
40
-
41
-
42
-
43
-
44
-
45
-
46
-
47
-
48
-
49
-
50
-
51
-
52
-
53
-
54
-
55
-
56
-
57
-
58
-
59
-
 60
60 -
 61
61 -
 62
62 -
 63
63 -
 64
64 -
 65
65 -
 66
66 -
 67
67 -
 68
68 -
 69
69 -
 70
70 -
71
-
72
-
73
-
74
-
75
-
76
-
77
-
78
-
79
-
80
-
81
-
82
-
83
-
84
-
85
-
86
-
87
-
88
-
89
-
90
-
91
-
92
-
93
-
94
-
95
-
96
-
97
-
98
-
99
-
100
-
101
-
102
-
103
-
104
-
105
-
106
-
107
-
108
-
109
-
110
-
111
-
112
-
113
-
114
-
115
-
116
-
117
-
118
-
119
-
120
-
121
-
122
-
123
-
124
-
125
-
126
-
127
-
128
-
129
-
130
-
131
-
132
-
133
-
134
 |
 |
