Dell EqualLogic PS6210S EqualLogic Auto-Snapshot Manager/Microsoft Edition Ver - Page 77
Restore All Databases, Restore a Database as New
 |
View all Dell EqualLogic PS6210S manuals
Add to My Manuals
Save this manual to your list of manuals |
Page 77 highlights
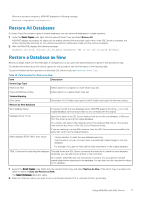
When the operation completes, ASM/ME displays the following message: Restore completed successfully. Restore All Databases If a Smart Copy Set contains copies of several databases, you can restore all databases in a single operation. 1. Under the Smart Copies node, right-click the relevant Smart Copy and select Restore All. ASM/ME displays its progress for steps such as setting volumes offline and later, back online. If the SQL Server is clustered, the cluster physical disk resources for the volumes are placed in maintenance mode until the restore completes. 2. Wait until ASM/ME displays the following message: Database restored. Refresh the database management GUI to see the restored database. Restore a Database as New Before you begin, make sure the ASM agent is configured to run as a user who has permissions to perform this operation in SQL. For detailed information about the various options for this procedure, see the information in the following table. To perform Restore as New operations on alternate SQL Server hosts, see Importing a Smart Copy. Table 28. Data Required for Restore As New Item Description Smart Copy Type Restore as New Select option for a snapshot or clone Smart Copy set. Clone and Restore as New Select option for a replica Smart Copy set. Volume Mapping Drive Letter Drive letter, NTFS folder mount point or ReFS folder mount point for the new volume. Restore as New Database New Database Name If required, modify the new database name. ASM/ME appends the string _new to the original database name to ensure that it is not confused with the original. Database Server to use Specify the name of an SQL Server instance that serves the new database, if different from the instance serving the original database. On a cluster, this name is the network name of the clustered SQL Server. The current node must be the owner of the SQL Server Resource Group. If you are restoring to a new SQL instance, then the SQL Server instance should be the same SQL version as the original instance. Make database READ-ONLY after attach • Choose whether to make the new database read-only. • Use this option if you do not want users to accidentally make changes to the new database. For example, if you plan to make side-by-side restorations to the original database. TSQL Command for attaching the database This field shows the SQL Server commands that execute to create the new database. Optionally, you can add custom actions to the command. On a cluster, ASM/ME does not execute this command. You must perform several manual steps before attaching to the database. You can then use this command to attach to the database. 1. Expand the Smart Copies node. Right-click the relevant Smart Copy and select Restore As New. If the Smart Copy is a replica, the option to select is Clone and Restore as New. The Select Databases dialog box opens. 2. Make sure that any volume you want to use is not already mounted. If it is, unmount it before proceeding. Using ASM/ME with SQL Server 77
-
 1
1 -
2
-
3
-
4
-
5
-
6
-
7
-
8
-
9
-
10
-
11
-
12
-
13
-
14
-
15
-
16
-
17
-
18
-
19
-
20
-
21
-
22
-
23
-
24
-
25
-
26
-
27
-
28
-
29
-
30
-
31
-
32
-
33
-
34
-
35
-
36
-
37
-
38
-
39
-
40
-
41
-
42
-
43
-
44
-
45
-
46
-
47
-
48
-
49
-
50
-
51
-
52
-
53
-
54
-
55
-
56
-
57
-
58
-
59
-
60
-
61
-
62
-
63
-
64
-
65
-
66
-
67
-
68
-
69
-
70
-
71
-
 72
72 -
 73
73 -
 74
74 -
 75
75 -
 76
76 -
 77
77 -
 78
78 -
 79
79 -
 80
80 -
 81
81 -
 82
82 -
83
-
84
-
85
-
86
-
87
-
88
-
89
-
90
-
91
-
92
-
93
-
94
-
95
-
96
-
97
-
98
-
99
-
100
-
101
-
102
-
103
-
104
-
105
-
106
-
107
-
108
-
109
-
110
-
111
-
112
-
113
-
114
-
115
-
116
-
117
-
118
-
119
-
120
-
121
-
122
-
123
-
124
-
125
-
126
-
127
-
128
-
129
-
130
-
131
-
132
-
133
-
134
 |
 |
