Dell EqualLogic PS6210XS Updating Firmware for EqualLogic PS Series Storage Ar - Page 17
Update the PS Series Firmware Using the CLI, Constraints and Prerequisites for Using the CLI
 |
View all Dell EqualLogic PS6210XS manuals
Add to My Manuals
Save this manual to your list of manuals |
Page 17 highlights
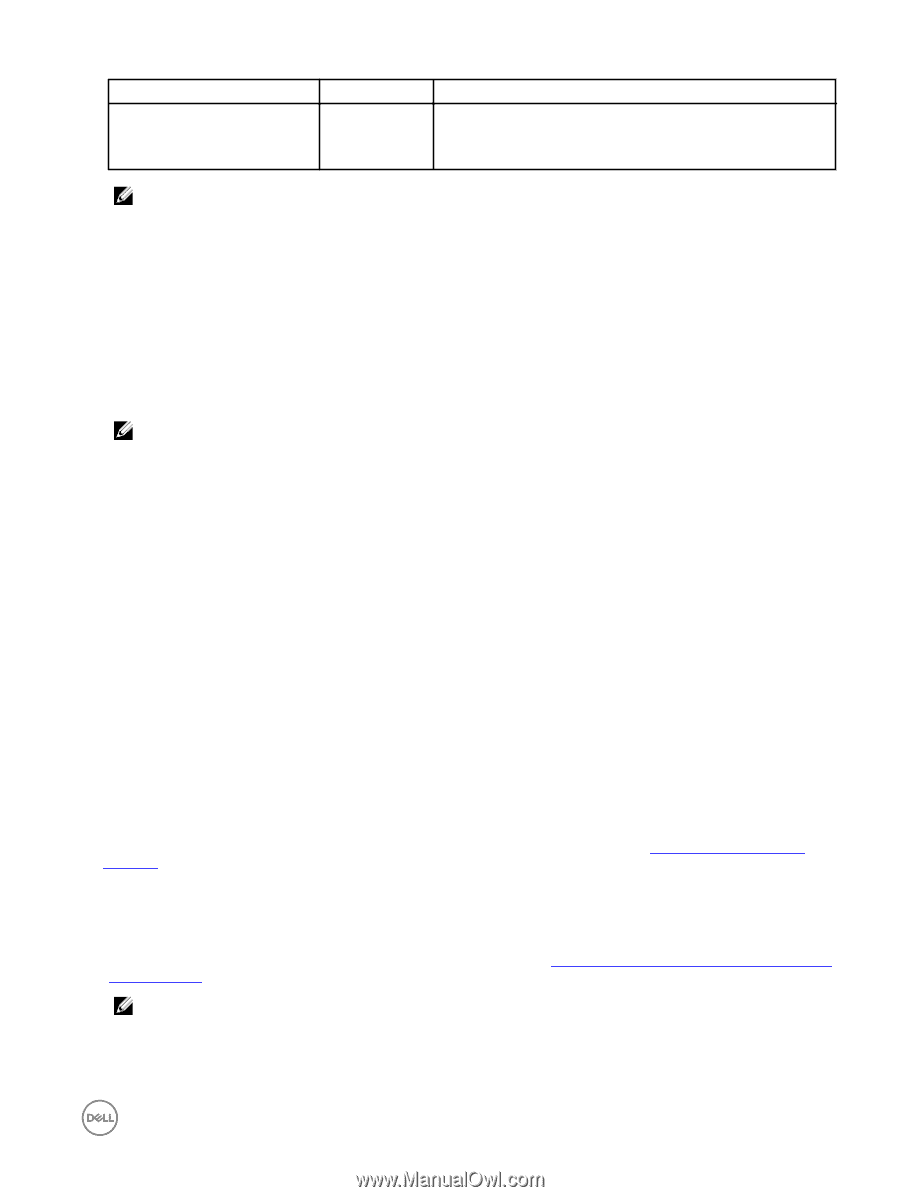
Status Up to date User Action None Operation (what is happening in background) Standby controller has updated, restarted, and is now the active controller on the member. Group is stable and the active (now standby) controller is finishing the restart operation. NOTE: • The firmware update is not complete until the updated members restart. Dell recommends that you restart one group member at a time after downloading the firmware on all the members. • During the member restart process, the secondary control module is restarted first. After the secondary control module has completed the restart operation, the active control module restarts, and active connections fail over to the secondary control module. This failover process might result in a temporary loss of connectivity to the Group Manager GUI, if connected through that member, during the restart. The Group Manager GUI displays Lost Connectivity! in the top-right corner. This behavior is normal. Log in to the Group Manager GUI again to continue. • In a single-member group, or on a member with a single control module, when the member goes offline during its update process, the status might not display correctly. A member that is offline cannot report its status. When the member restarts and is again online, the GUI displays the correct status. 9. Repeat steps 6 and 7 for each additional group member. NOTE: Between updating members, wait for the SAN to stabilize before continuing with the update. For example, make sure all members and volumes are online. 10. When all group members are updated to the same firmware version, click Close. 11. Clear the browser cache and the Java cache, especially if you updated firmware between maintenance releases. 12. Close and restart the GUI after all members are updated to make sure the GUI is consistent with the new features in the updated firmware. 13. Verify the firmware update by selecting Members in the navigation panel, selecting the members for which you have updated firmware, and then clicking the Controllers tab. Update the PS Series Firmware Using the CLI This section provides the procedure to update the firmware using the CLI. Constraints and Prerequisites for Using the CLI • If you are using a serial connection, make sure the connection has the following characteristics: - 9600 baud - 1 STOP bit - No parity - 8 data bits - No hardware flow control • On an array with dual control modules, the update command updates both control modules. See PS Series Array CLI Output Examples for examples of the screen output displayed during this process. Update the Firmware Using the CLI To update the firmware using the CLI: 1. Use FTP to copy the firmware .tgz file to the array that you are updating. See Output Displayed When Firmware Is Copied to an Array Using FTP for an example of screen output shown when you perform this step. NOTE: On Linux systems, run the scp command to copy the firmware file to the array. If you want to use scp, skip to step 2. a. Type ftp to open an FTP session. b. Type open, followed by the IP address of the array to establish a connection. PS Series Array Firmware Update Procedure 17
-
 1
1 -
2
-
3
-
4
-
5
-
6
-
7
-
8
-
9
-
10
-
11
-
 12
12 -
 13
13 -
 14
14 -
 15
15 -
 16
16 -
 17
17 -
 18
18 -
 19
19 -
 20
20 -
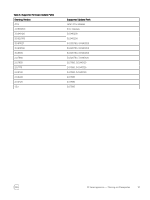 21
21 -
 22
22 -
23
-
24
-
25
-
26
-
27
-
28
-
29
-
30
-
31
 |
 |