Dell Force10 S55T Installing the S55 System - Page 29
Replace an AC or DC power supply, To replace a power supply, follow the steps below
 |
View all Dell Force10 S55T manuals
Add to My Manuals
Save this manual to your list of manuals |
Page 29 highlights
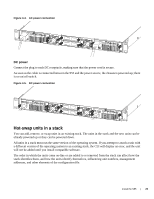
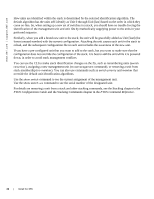
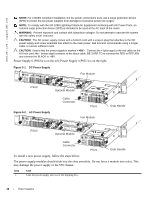
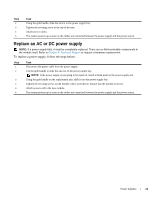
Step Task 2 Using the grab handle, slide the unit in to the power supply bay. 3 Tighten the securing screw at the top of the unit. 4 Attach power cables. 5 The system powers up as soon as the cables are connected between the power supply and the power source. Replace an AC or DC power supply NOTE: If a power supply fails, it must be completely replaced. There are no field servicable components in the module itself. Refer to Chapter 9, Technical Support to request a hardware replacement. To replace a power supply, follow the steps below: Step Task 1 Disconnect the power cable from the power supply. 2 Use the grab handle to slide the unit out of the power supply bay. NOTE: If the power supply is not going to be replaced, attach a blank panel to the power supply slot. 3 Using the grab handle on the replacement unit, slide it into the power supply bay. 4 Tighten the securing screws on the module with a screwdriver. Ensure that the module is secure. 5 Attach power cord to the new module. 6 The system powers up as soon as the cables are connected between the power supply and the power source. Power Supplies | 29
-
 1
1 -
2
-
3
-
4
-
5
-
6
-
7
-
8
-
9
-
10
-
11
-
12
-
13
-
14
-
15
-
16
-
17
-
18
-
19
-
20
-
21
-
22
-
23
-
 24
24 -
 25
25 -
 26
26 -
 27
27 -
 28
28 -
 29
29 -
 30
30 -
 31
31 -
 32
32 -
 33
33 -
 34
34 -
35
-
36
-
37
-
38
-
39
-
40
-
41
-
42
-
43
-
44
-
45
-
46
-
47
-
48
-
49
-
50
 |
 |
