Dell Force10 S55T Installing the S55 System - Page 35
Contact Dell Force10 Networks Technical Support for assistance if necessary.
 |
View all Dell Force10 S55T manuals
Add to My Manuals
Save this manual to your list of manuals |
Page 35 highlights
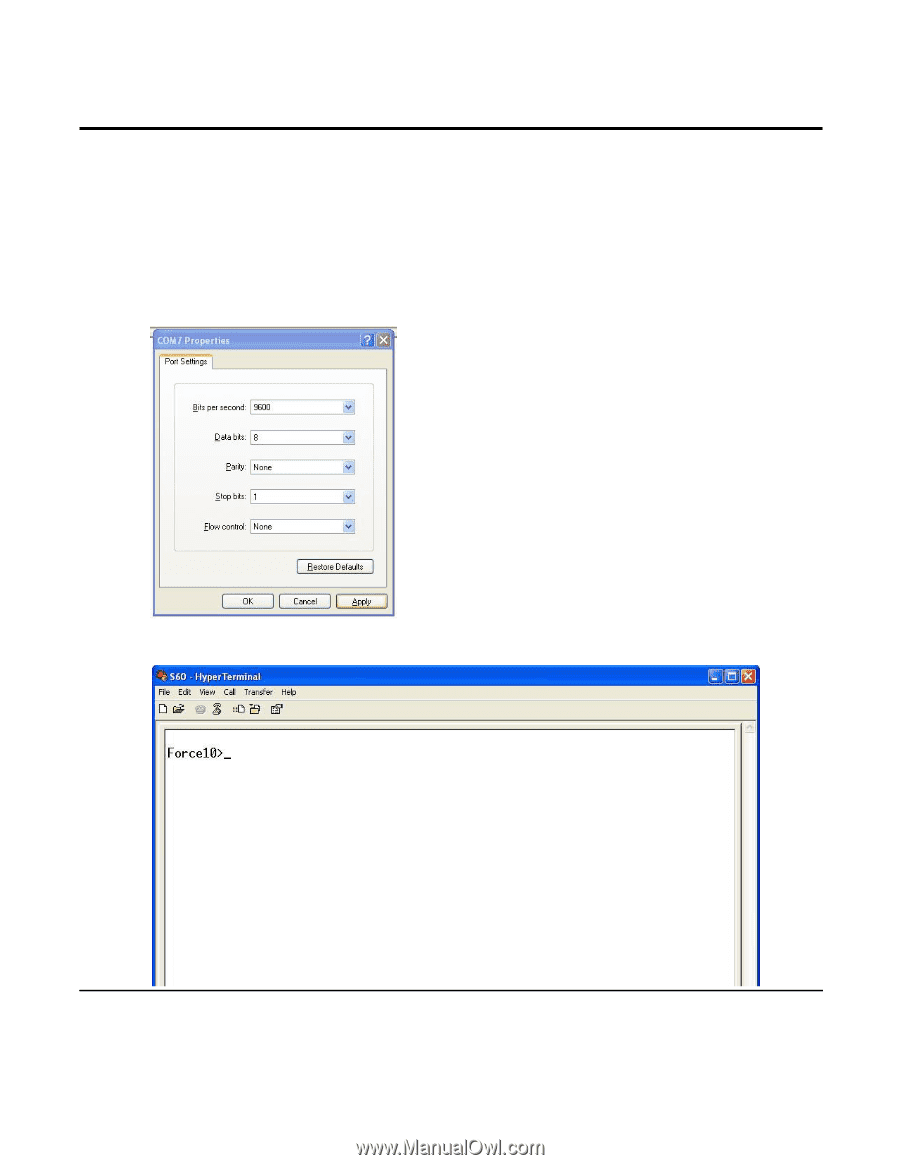
Step Task (continued) 2 Connect the USB-A end of cable (supplied) into an available USB port on the PC 3 Connect the USB-B end of cable into the USB-B console port on the S55 ( 4 Power on the S55. 5 Install necessary USB device drivers (internet connection required). Contact Dell Force10 Networks Technical Support for assistance if necessary. 6 Open your terminal software emulation program to access the S55. 7 Using the terminal settings shown here, set the terminal connection settings. • 9600 baud rate, No parity, 8 data bits, 1 stop bit, No flow control 8 The CLI command prompt appears (shown below) when you are connected to the S55. Access the console ports | 35
-
 1
1 -
2
-
3
-
4
-
5
-
6
-
7
-
8
-
9
-
10
-
11
-
12
-
13
-
14
-
15
-
16
-
17
-
18
-
19
-
20
-
21
-
22
-
23
-
24
-
25
-
26
-
27
-
28
-
29
-
 30
30 -
 31
31 -
 32
32 -
 33
33 -
 34
34 -
 35
35 -
 36
36 -
 37
37 -
 38
38 -
 39
39 -
 40
40 -
41
-
42
-
43
-
44
-
45
-
46
-
47
-
48
-
49
-
50
 |
 |
Access the console ports
|
35
2
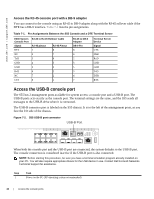
Connect the USB-A end of cable (supplied) into an available USB port on the PC
3
Connect the USB-B end of cable into the USB-B console port on the S55 (
4
Power on the S55.
5
Install necessary USB device drivers (internet connection required).
Contact Dell Force10 Networks Technical Support for assistance if necessary.
6
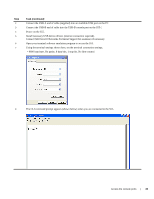
Open your terminal software emulation program to access the S55.
7
Using the terminal settings shown here, set the terminal connection settings.
•
9600 baud rate, No parity, 8 data bits, 1 stop bit, No flow control
8
The CLI command prompt appears (shown below) when you are connected to the S55.
Step
Task
(continued)