Dell Inspiron 2600 Solutions Guide - Page 85
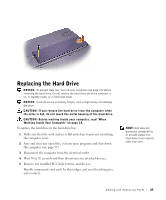
Replacing the Hard Drive
 |
View all Dell Inspiron 2600 manuals
Add to My Manuals
Save this manual to your list of manuals |
Page 85 highlights
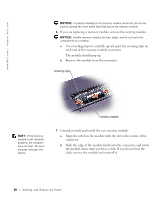
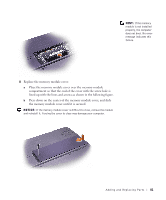
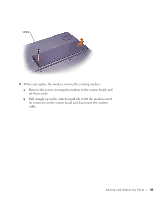
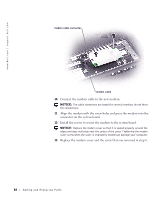
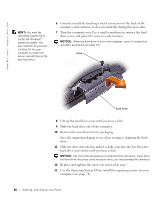
Replacing the Hard Drive NOTICE: To prevent data loss, turn off your computer (see page 37) before removing the hard drive. Do not remove the hard drive while the computer is on, in standby mode, or in hibernate mode. NOTICE: Hard drives are extremely fragile; even a slight bump can damage the drive. CAUTION: If you remove the hard drive from the computer when the drive is hot, do not touch the metal housing of the hard drive. CAUTION: Before working inside your computer, read "When Working Inside Your Computer" on page 14. To replace the hard drive in the hard drive bay: 1 Make sure that the work surface is flat and clean to prevent scratching the computer cover. 2 Save and close any open files, exit any open programs and shut down the computer (see page 37). 3 Disconnect the computer from the electrical outlet. 4 Wait 10 to 20 seconds and then disconnect any attached devices. 5 Remove any installed PC Cards, battery, and devices. Handle components and cards by their edges, and avoid touching pins and contacts. HINT: Dell does not guarantee compatibility or provide support for hard drives from sources other than Dell. Adding and Re placing Parts 85
-
 1
1 -
2
-
3
-
4
-
5
-
6
-
7
-
8
-
9
-
10
-
11
-
12
-
13
-
14
-
15
-
16
-
17
-
18
-
19
-
20
-
21
-
22
-
23
-
24
-
25
-
26
-
27
-
28
-
29
-
30
-
31
-
32
-
33
-
34
-
35
-
36
-
37
-
38
-
39
-
40
-
41
-
42
-
43
-
44
-
45
-
46
-
47
-
48
-
49
-
50
-
51
-
52
-
53
-
54
-
55
-
56
-
57
-
58
-
59
-
60
-
61
-
62
-
63
-
64
-
65
-
66
-
67
-
68
-
69
-
70
-
71
-
72
-
73
-
74
-
75
-
76
-
77
-
78
-
79
-
 80
80 -
 81
81 -
 82
82 -
 83
83 -
 84
84 -
 85
85 -
 86
86 -
 87
87 -
 88
88 -
 89
89 -
 90
90 -
91
-
92
-
93
-
94
-
95
-
96
-
97
-
98
-
99
-
100
-
101
-
102
-
103
-
104
-
105
-
106
-
107
-
108
-
109
-
110
-
111
-
112
-
113
-
114
-
115
-
116
-
117
-
118
-
119
-
120
-
121
-
122
-
123
-
124
-
125
-
126
-
127
-
128
-
129
-
130
-
131
-
132
-
133
-
134
 |
 |
