Dell Inspiron 546s Service Manual - Page 34
Replacing the Support Bracket, Replacing the Computer Cover, Back to Contents - power supply replacement
 |
View all Dell Inspiron 546s manuals
Add to My Manuals
Save this manual to your list of manuals |
Page 34 highlights
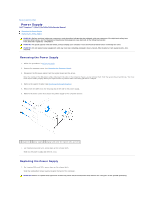
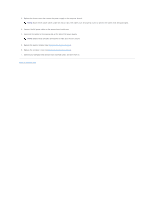
2. Replace the three screws that secure the power supply to the computer chassis. NOTE: Route the DC power cables under the chassis tabs. The cables must be properly routed to prevent the cables from being damaged. 3. Connect the DC power cables to the system board and drives. 4. Secure all the cables to the securing clip on the side of the power supply. NOTE: Double-check all cable connections to make sure they are secure. 5. Replace the support bracket (see Replacing the Support Bracket). 6. Replace the computer cover (see Replacing the Computer Cover). 7. Connect your computer and devices to an electrical outlet, and turn them on. Back to Contents Page
-
 1
1 -
2
-
3
-
4
-
5
-
6
-
7
-
8
-
9
-
10
-
11
-
12
-
13
-
14
-
15
-
16
-
17
-
18
-
19
-
20
-
21
-
22
-
23
-
24
-
25
-
26
-
27
-
28
-
 29
29 -
 30
30 -
 31
31 -
 32
32 -
 33
33 -
 34
34 -
 35
35 -
 36
36 -
 37
37 -
 38
38 -
 39
39 -
40
-
41
-
42
-
43
-
44
-
45
-
46
-
47
-
48
-
49
 |
 |

2.
Replace the three screws that secure the power supply to the computer chassis.
3.
Connect the DC power cables to the system board and drives.
4.
Secure all the cables to the securing clip on the side of the power supply.
5.
Replace the support bracket (see
Replacing the Support Bracket
).
6.
Replace the computer cover (see
Replacing the Computer Cover
).
7.
Connect your computer and devices to an electrical outlet, and turn them on.
Back to Contents Page
NOTE:
Route the DC power cables under the chassis tabs. The cables must be properly routed to prevent the cables from being damaged.
NOTE:
Double-check all cable connections to make sure they are secure.