Dell Inspiron 8100 Solutions Guide - Page 62
Replacing a Hard Drive - wireless
 |
View all Dell Inspiron 8100 manuals
Add to My Manuals
Save this manual to your list of manuals |
Page 62 highlights
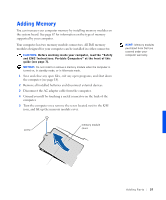
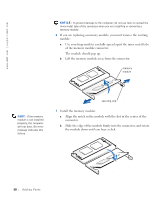
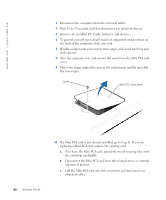
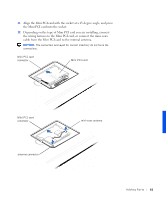
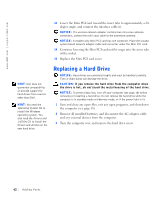
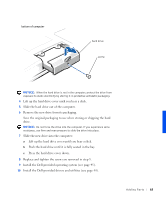
www.dell.com | support.dell.com HINT: Dell does not guarantee compatibility or provide support for hard drives from sources other than Dell. HINT: You need the Operating System CD to install the Windows operating system. You also need the Drivers and Utilities CD to install the drivers and utilities on the new hard drive. 13 Lower the Mini PCI card toward the inner tabs to approximately a 20degree angle, and connect the interface cable(s). NOTICE: If a wireless network adapter contains two mini-coax antenna connectors, connect the mini-coax cable to the outermost antenna. NOTICE: A modem-only Mini PCI card has one connector. Place the unused system board network adapter cable and connector under the Mini PCI card. 14 Continue lowering the Mini PCI card until it snaps into the inner tabs of the socket. 15 Replace the Mini PCI card cover. Replacing a Hard Drive NOTICE: Hard drives are extremely fragile and must be handled carefully. Even a slight bump can damage the drive. CAUTION: If you remove the hard drive from the computer when the drive is hot, do not touch the metal housing of the hard drive. NOTICE: To prevent data loss, turn off your computer (see page 18) before removing or installing a hard drive. Do not remove the hard drive while the computer is in standby mode or hibernate mode, or if the power light is lit. 1 Save and close any open files, exit any open programs, and shut down the computer (see page 18). 2 Remove all installed batteries, and disconnect the AC adapter cable and any external devices from the computer. 3 Turn the computer over, and remove the hard drive screw. 62 Ad di ng Par ts
-
 1
1 -
2
-
3
-
4
-
5
-
6
-
7
-
8
-
9
-
10
-
11
-
12
-
13
-
14
-
15
-
16
-
17
-
18
-
19
-
20
-
21
-
22
-
23
-
24
-
25
-
26
-
27
-
28
-
29
-
30
-
31
-
32
-
33
-
34
-
35
-
36
-
37
-
38
-
39
-
40
-
41
-
42
-
43
-
44
-
45
-
46
-
47
-
48
-
49
-
50
-
51
-
52
-
53
-
54
-
55
-
56
-
 57
57 -
 58
58 -
 59
59 -
 60
60 -
 61
61 -
 62
62 -
 63
63 -
 64
64 -
 65
65 -
 66
66 -
 67
67 -
68
-
69
-
70
-
71
-
72
-
73
-
74
-
75
-
76
-
77
-
78
-
79
-
80
-
81
-
82
-
83
-
84
-
85
-
86
-
87
-
88
-
89
-
90
-
91
-
92
-
93
-
94
-
95
-
96
-
97
-
98
-
99
-
100
-
101
-
102
-
103
-
104
-
105
-
106
-
107
-
108
-
109
-
110
-
111
-
112
-
113
-
114
-
115
-
116
-
117
-
118
 |
 |