Dell Inspiron One 2320 Owners Manual - Page 66
Replacing the System Board
 |
View all Dell Inspiron One 2320 manuals
Add to My Manuals
Save this manual to your list of manuals |
Page 66 highlights
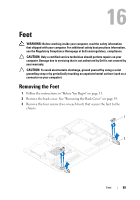
11 Disconnect all the cables connected to the system board. 12 Remove the eight screws that secure the system board to the chassis. 13 Lift the system board away from the computer and out of the chassis. 1 2 1 screws (8) 2 system board Replacing the System Board 1 Follow the instructions in "Before You Begin" on page 11. 2 Align the screw holes on the system board with the screw holes on the chassis. 3 Replace the eight screws that secure the system board to the chassis. 4 Connect all the required cables to the system board. 5 Replace the processor. See "Replacing the Processor" on page 84. 6 Replace the processor heat-sink. See "Replacing the Processor Heat-Sink" on page 80. 66 System Board
-
 1
1 -
2
-
3
-
4
-
5
-
6
-
7
-
8
-
9
-
10
-
11
-
12
-
13
-
14
-
15
-
16
-
17
-
18
-
19
-
20
-
21
-
22
-
23
-
24
-
25
-
26
-
27
-
28
-
29
-
30
-
31
-
32
-
33
-
34
-
35
-
36
-
37
-
38
-
39
-
40
-
41
-
42
-
43
-
44
-
45
-
46
-
47
-
48
-
49
-
50
-
51
-
52
-
53
-
54
-
55
-
56
-
57
-
58
-
59
-
60
-
 61
61 -
 62
62 -
 63
63 -
 64
64 -
 65
65 -
 66
66 -
 67
67 -
 68
68 -
 69
69 -
 70
70 -
 71
71 -
72
-
73
-
74
-
75
-
76
-
77
-
78
-
79
-
80
-
81
-
82
-
83
-
84
-
85
-
86
-
87
-
88
-
89
-
90
-
91
-
92
-
93
-
94
-
95
-
96
-
97
-
98
-
99
-
100
-
101
-
102
-
103
-
104
-
105
-
106
-
107
-
108
-
109
-
110
-
111
-
112
-
113
-
114
-
115
-
116
-
117
-
118
-
119
-
120
-
121
-
122
-
123
-
124
-
125
-
126
-
127
-
128
-
129
-
130
-
131
-
132
-
133
-
134
-
135
-
136
-
137
-
138
 |
 |

66
System Board
11
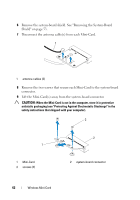
Disconnect all the cables connected to the system board.
12
Remove the eight screws that secure the system board to the chassis.
13
Lift the system board away from the computer and out of the chassis.
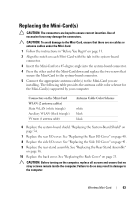
Replacing the System Board
1
Follow the instructions in "Before You Begin" on page 11.
2
Align the screw holes on the system board with the screw holes on the
chassis.
3
Replace the eight screws that secure the system board to the chassis.
4
Connect all the required cables to the system board.
5
Replace the processor. See "Replacing the Processor" on page 84.
6
Replace the processor heat-sink. See "Replacing the Processor Heat-Sink"
on page 80.
1
screws (8)
2
system board
2
1