Dell OptiPlex 3240 All-in-One Owners Manual - Page 29
Removing the coin cell battery, Removing the processor, Before Working Inside Your Computer, stand
 |
View all Dell OptiPlex 3240 All-in-One manuals
Add to My Manuals
Save this manual to your list of manuals |
Page 29 highlights
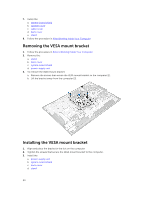
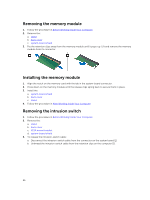
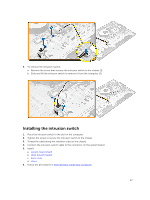
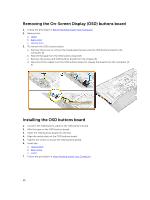
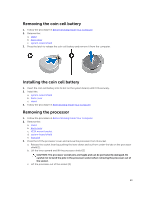
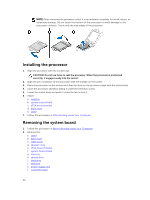
Removing the coin cell battery 1. Follow the procedure in Before Working Inside Your Computer. 2. Remove the: a. stand b. back cover c. system-board shield 3. Press the latch to release the coin cell battery and remove it from the computer. Installing the coin cell battery 1. Insert the coin cell battery into its slot on the system board, until it fits securely. 2. Install the: a. system-board shield b. back cover c. stand 3. Follow the procedure in After Working Inside Your Computer. Removing the processor 1. Follow the procedure in Before Working Inside Your Computer. 2. Remove the: a. stand b. back cover c. VESA mount bracket d. system-board shield e. heat sink 3. Press the Lift the processor cover and remove the processor from its socket. a. Release the socket lever by pushing the lever down and out from under the tab on the processor shield [1]. b. Lift the lever upward and lift the processor shield [2]. CAUTION: The processor socket pins are fragile and can be permanently damaged. Be careful not to bend the pins in the processor socket when removing the processor out of the socket. c. Lift the processor out of the socket [3]. 29
-
 1
1 -
2
-
3
-
4
-
5
-
6
-
7
-
8
-
9
-
10
-
11
-
12
-
13
-
14
-
15
-
16
-
17
-
18
-
19
-
20
-
21
-
22
-
23
-
 24
24 -
 25
25 -
 26
26 -
 27
27 -
 28
28 -
 29
29 -
 30
30 -
 31
31 -
 32
32 -
 33
33 -
 34
34 -
35
-
36
-
37
-
38
-
39
-
40
-
41
-
42
-
43
-
44
-
45
-
46
-
47
-
48
-
49
-
50
-
51
-
52
-
53
-
54
-
55
-
56
-
57
 |
 |