Dell OptiPlex 3240 All-in-One Owners Manual - Page 34
Installing the system board
 |
View all Dell OptiPlex 3240 All-in-One manuals
Add to My Manuals
Save this manual to your list of manuals |
Page 34 highlights
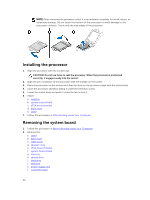
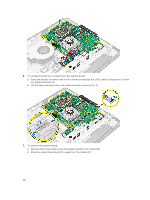
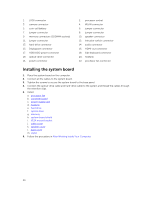
1. LVDS connector 3. camera connector 5. coin-cell battery 7. jumper connector 9. memory connectors (SODIMM sockets) 11. jumper connector 13. hard-drive connector 15. Displayport connector 17. HDD/ODD power connector 19. optical-drive connector 21. power connector 2. processor socket 4. WLAN connector 6. jumper connector 8. jumper connector 10. speaker connector 12. intrusion-switch connector 14. audio connector 16. HDMI-out connector 18. Side keyboard connector 20. heatsink 22. processor fan connector Installing the system board 1. Place the system board on the computer. 2. Connect all the cables to the system board. 3. Tighten the screws to secure the system board to the base panel. 4. Connect the optical-drive cable and hard-drive cable to the system and thread the cables through the retention clips. 5. Install: a. processor fan b. converter board c. power-supply unit d. heatsink e. hard drive f. optical drive g. memory h. system-board shield i. VESA mount bracket j. cable cover k. speaker cover l. back cover m. stand 6. Follow the procedure in After Working Inside Your Computer. 34
-
 1
1 -
2
-
3
-
4
-
5
-
6
-
7
-
8
-
9
-
10
-
11
-
12
-
13
-
14
-
15
-
16
-
17
-
18
-
19
-
20
-
21
-
22
-
23
-
24
-
25
-
26
-
27
-
28
-
 29
29 -
 30
30 -
 31
31 -
 32
32 -
 33
33 -
 34
34 -
 35
35 -
 36
36 -
 37
37 -
 38
38 -
 39
39 -
40
-
41
-
42
-
43
-
44
-
45
-
46
-
47
-
48
-
49
-
50
-
51
-
52
-
53
-
54
-
55
-
56
-
57
 |
 |