Dell OptiPlex GX150 User Guide - Page 112
Removing an Expansion Card in the Small Form-Factor System - power on password reset
 |
View all Dell OptiPlex GX150 manuals
Add to My Manuals
Save this manual to your list of manuals |
Page 112 highlights
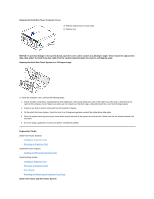
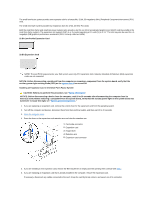
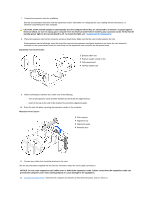
NOTE: After you open and close the cover, the chassis intrusion detector causes the following message to appear on the screen at the next computer start-up: ALERT! Cover was previously removed. 13. Reset the chassis intrusion detector by changing Chassis Intrusion to Enabled or Enabled-Silent. NOTE: If a setup password has been assigned by someone else, contact your network administrator for information on resetting the chassis intrusion detector. 14. If you installed a sound card, perform the following steps: a. Enter system setup, select Integrated Devices, and change the setting for Sound to Off. b. Connect external audio devices to the sound card's connectors. Do not connect external audio devices to the microphone, speaker/headphone, or line-in connectors on the I/O panel (see "I/O Panel"). 15. If you installed an add-in network adapter, perform the following steps: a. Enter system setup, select Integrated Devices and change the setting for Network Interface Card to Off. b. Connect the network cable to the add-in network adapter's connectors. Do not connect the network cable to the integrated connector on the I/O panel (see "I/O Panel"). Removing an Expansion Card in the Small Form-Factor System CAUTION: Before you perform this procedure, see "Safety Information." NOTICE: Before disconnecting a device from the computer, wait 10 to 20 seconds after disconnecting the computer from its electrical outlet. Before removing a component from the system board, verify that the standby power light on the system board has turned off. To locate this light, see "System Board Components." 1. Turn off the computer and devices, disconnect them from their electrical outlets, and wait 10 to 20 seconds. 2. Open the computer cover. 3. Press the lever on the expansion card retention arm and raise the retention arm (see the illustration for your computer in "Installing an Expansion Card"). 4. If necessary, disconnect any cables connected to the card. 5. Grasp the card by its top corners, and ease it out of its connector. 6. If you are removing the card permanently, install a filler bracket in the empty card-slot opening. If you need a filler bracket, contact Dell. NOTE: Installing filler brackets over empty card-slot openings is necessary to maintain Federal Communications Commission (FCC) certification of the computer. The brackets also keep dust and dirt out of your computer. 7. Lower the retention arm and press it into place, securing the expansion card(s) in the computer. 8. Close the computer cover, reconnect the computer and devices to their electrical outlets, and turn them on. NOTE: After you open and close the cover, the chassis intrusion detector causes the following message to appear on the screen at the next computer start-up: ALERT! Cover was previously removed. 9. Reset the chassis intrusion detector by changing Chassis Intrusion to Enabled or Enabled-Silent. NOTE: If a setup password has been assigned by someone else, contact your network administrator for information on resetting the chassis intrusion detector. 10. If you removed a sound card, perform the following steps: a. Enter system setup, select Integrated Devices, and change the setting for Sound to On. b. Connect external audio devices to the audio connectors on the I/O panel (see "I/O Panel"). 11. If you removed an add-in network adapter, perform the following steps:
-
 1
1 -
2
-
3
-
4
-
5
-
6
-
7
-
8
-
9
-
10
-
11
-
12
-
13
-
14
-
15
-
16
-
17
-
18
-
19
-
20
-
21
-
22
-
23
-
24
-
25
-
26
-
27
-
28
-
29
-
30
-
31
-
32
-
33
-
34
-
35
-
36
-
37
-
38
-
39
-
40
-
41
-
42
-
43
-
44
-
45
-
46
-
47
-
48
-
49
-
50
-
51
-
52
-
53
-
54
-
55
-
56
-
57
-
58
-
59
-
60
-
61
-
62
-
63
-
64
-
65
-
66
-
67
-
68
-
69
-
70
-
71
-
72
-
73
-
74
-
75
-
76
-
77
-
78
-
79
-
80
-
81
-
82
-
83
-
84
-
85
-
86
-
87
-
88
-
89
-
90
-
91
-
92
-
93
-
94
-
95
-
96
-
97
-
98
-
99
-
100
-
101
-
102
-
103
-
104
-
105
-
106
-
 107
107 -
 108
108 -
 109
109 -
 110
110 -
 111
111 -
 112
112 -
 113
113 -
 114
114 -
 115
115 -
 116
116 -
 117
117 -
118
-
119
-
120
-
121
-
122
-
123
-
124
-
125
-
126
-
127
-
128
-
129
-
130
-
131
-
132
-
133
-
134
-
135
-
136
-
137
-
138
-
139
-
140
-
141
-
142
-
143
-
144
-
145
-
146
-
147
-
148
-
149
-
150
-
151
-
152
-
153
-
154
 |
 |