Dell OptiPlex GX150 User Guide - Page 53
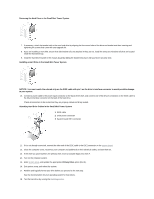
Removing the 3.5-Inch Floppy Drive in the Small Form-Factor Desktop System
 |
View all Dell OptiPlex GX150 manuals
Add to My Manuals
Save this manual to your list of manuals |
Page 53 highlights
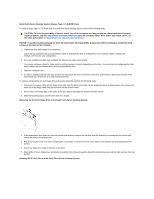
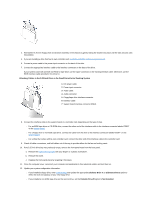
Small Form-Factor Desktop System Floppy, Tape, or CD-ROM Drives To install a floppy, tape, or CD-ROM drive in a small form-factor desktop system, perform the following steps. CAUTION: To avoid the possibility of electric shock, turn off the computer and any peripherals, disconnect them from their electrical outlets, and then wait at least 5 seconds before you open the computer cover. Also, before you install a drive, see the other precautions in "Safety First-For You and Your Computer." NOTICE: To avoid possibly damaging the drive by electrostatic discharge (ESD), ground yourself by touching an unpainted metal surface on the back of the computer. 1. Unpack the drive and prepare it for installation. Check the documentation that accompanied the drive to verify that the drive is configured for your computer system. Change any settings necessary for your configuration. 2. If you are installing an EIDE drive, configure the drive for the cable select setting. You usually configure a drive for cable select by setting a jumper or switch, depending on the drive. For instructions on configuring the cable select setting, see the documentation that accompanied the drive. 3. Open the computer cover. 4. If a drive is already installed in the bay and you are replacing it, be sure to disconnect the power and interface cables from the back of the drive before you remove the drive and bracket assembly. To remove and install the 3.5-inch floppy drive and bracket assembly, perform the following steps: 1. Disconnect the power cable and the floppy drive cable from the back of the drive. On the small form-factor desktop system, also remove the other end of the floppy cable from the connector on the system board. 2. Press inward on the two tabs on the sides of the drive bay to disengage the bracket from the chassis. 3. Slide the bracket upward, and remove it from the chassis. Removing the 3.5-Inch Floppy Drive in the Small Form-Factor Desktop System 4. If the replacement drive does not have the bracket rails attached, remove the old drive from the bracket by removing the four screws that secure the drive to the bracket rails. 5. Attach the bracket to the new drive by aligning the screw holes on the drive with the screw holes on the bracket rails and tightening all four screws. 6. Attach the floppy drive cable to the back of the drive. 7. Reinstall the 3.5-inch floppy drive and bracket assembly in the chassis by gently sliding the bracket into place until the tabs securely click into position. Installing the 3.5 Inch Drive in the Small Form-Factor Desktop System
-
 1
1 -
2
-
3
-
4
-
5
-
6
-
7
-
8
-
9
-
10
-
11
-
12
-
13
-
14
-
15
-
16
-
17
-
18
-
19
-
20
-
21
-
22
-
23
-
24
-
25
-
26
-
27
-
28
-
29
-
30
-
31
-
32
-
33
-
34
-
35
-
36
-
37
-
38
-
39
-
40
-
41
-
42
-
43
-
44
-
45
-
46
-
47
-
 48
48 -
 49
49 -
 50
50 -
 51
51 -
 52
52 -
 53
53 -
 54
54 -
 55
55 -
 56
56 -
 57
57 -
 58
58 -
59
-
60
-
61
-
62
-
63
-
64
-
65
-
66
-
67
-
68
-
69
-
70
-
71
-
72
-
73
-
74
-
75
-
76
-
77
-
78
-
79
-
80
-
81
-
82
-
83
-
84
-
85
-
86
-
87
-
88
-
89
-
90
-
91
-
92
-
93
-
94
-
95
-
96
-
97
-
98
-
99
-
100
-
101
-
102
-
103
-
104
-
105
-
106
-
107
-
108
-
109
-
110
-
111
-
112
-
113
-
114
-
115
-
116
-
117
-
118
-
119
-
120
-
121
-
122
-
123
-
124
-
125
-
126
-
127
-
128
-
129
-
130
-
131
-
132
-
133
-
134
-
135
-
136
-
137
-
138
-
139
-
140
-
141
-
142
-
143
-
144
-
145
-
146
-
147
-
148
-
149
-
150
-
151
-
152
-
153
-
154
 |
 |
