Dell OptiPlex GX150 User Guide - Page 60
Attaching Floppy Drive Cables in the Small Mini-Tower System
 |
View all Dell OptiPlex GX150 manuals
Add to My Manuals
Save this manual to your list of manuals |
Page 60 highlights
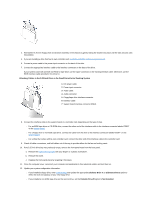
7. Install the 3.5-inch floppy drive and bracket assembly in the chassis by gently sliding the bracket into place until the tabs securely click into position. Installing the 3.5 Inch Drive in the Small Mini-Tower System 8. Connect the power cable to the power input connector on the back of the drive. 9. Connect the appropriate interface cable to the interface connector on the back of the drive. Attaching Floppy Drive Cables in the Small Mini-Tower System 1 DC power cable 2 Floppy drive connector 3 System board floppy connector (DSKT) To remove and install a 5.25-inch drive in a small mini-tower system, perform the following steps: 1. If you are replacing a 5.25-inch drive and bracket assembly, follow these instructions. If you are installing a new drive, skip to step 4. a. Press inward on the two tabs on the sides of the drive bay to disengage the bracket from the chassis. b. Slide the bracket upward, and remove it from the chassis. Removing the 5.25-Inch Drive in the Small Mini-Tower System
-
 1
1 -
2
-
3
-
4
-
5
-
6
-
7
-
8
-
9
-
10
-
11
-
12
-
13
-
14
-
15
-
16
-
17
-
18
-
19
-
20
-
21
-
22
-
23
-
24
-
25
-
26
-
27
-
28
-
29
-
30
-
31
-
32
-
33
-
34
-
35
-
36
-
37
-
38
-
39
-
40
-
41
-
42
-
43
-
44
-
45
-
46
-
47
-
48
-
49
-
50
-
51
-
52
-
53
-
54
-
 55
55 -
 56
56 -
 57
57 -
 58
58 -
 59
59 -
 60
60 -
 61
61 -
 62
62 -
 63
63 -
 64
64 -
 65
65 -
66
-
67
-
68
-
69
-
70
-
71
-
72
-
73
-
74
-
75
-
76
-
77
-
78
-
79
-
80
-
81
-
82
-
83
-
84
-
85
-
86
-
87
-
88
-
89
-
90
-
91
-
92
-
93
-
94
-
95
-
96
-
97
-
98
-
99
-
100
-
101
-
102
-
103
-
104
-
105
-
106
-
107
-
108
-
109
-
110
-
111
-
112
-
113
-
114
-
115
-
116
-
117
-
118
-
119
-
120
-
121
-
122
-
123
-
124
-
125
-
126
-
127
-
128
-
129
-
130
-
131
-
132
-
133
-
134
-
135
-
136
-
137
-
138
-
139
-
140
-
141
-
142
-
143
-
144
-
145
-
146
-
147
-
148
-
149
-
150
-
151
-
152
-
153
-
154
 |
 |
