Dell OptiPlex GX150 User Guide - Page 129
Diskette Drives
 |
View all Dell OptiPlex GX150 manuals
Add to My Manuals
Save this manual to your list of manuals |
Page 129 highlights
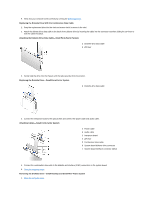
11. Connect the other end of the optical drive data cable and a power cable to the ZIP drive. 12. Connect the diskette drive data cable and a power cable to the diskette drive. 13. Connect the end of the hard drive data cable that is labeled HD2/ZIP and a power cable to the second hard drive. 14. Connect the other end of the hard drive data cable that is labeled HD1 and a power cable to the first hard drive. 15. Make sure that all other cables are attached to the correct devices and that the cables are firmly seated. 16. Close the computer cover. 17. Turn on the computer. 18. Enter system setup and update the appropriate Primary Drive option, 0 or 1. See "System Settings" for complete information on system setup. 19. Reset the chassis intrusion detector. 20. Restart the system. 21. Test the second hard drive by running the Dell Diagnostics. See "Solving Problems" for complete information. When the procedure is complete, the drives should be arranged in the following order, from left to right as shown in the illustration "System Cables": l Optical drive l ZIP drive l Diskette drive l Second hard drive l First hard drive Diskette Drives CAUTION: To avoid the possibility of electric shock, turn off the computer and any peripherals, disconnect them from electrical outlets, and then wait at least 5 seconds before you open the computer cover. Also, before you install a drive, see the other precautions in "Safety Information." Small Form-Factor Desktop System l Removing the Diskette Drive l Replacing the Diskette Drive Small Desktop System l Removing the Diskette Drive l Replacing the Diskette Drive l Attaching Cables Small Mini-Tower System l Removing the Diskette Drive l Replacing the Diskette Drive l Attaching Cables Removing the Diskette Drive-Small Form-Factor Desktop System Select the appropriate instructions for the system: l Removing the Diskette Drive With the Strip Cable
-
 1
1 -
2
-
3
-
4
-
5
-
6
-
7
-
8
-
9
-
10
-
11
-
12
-
13
-
14
-
15
-
16
-
17
-
18
-
19
-
20
-
21
-
22
-
23
-
24
-
25
-
26
-
27
-
28
-
29
-
30
-
31
-
32
-
33
-
34
-
35
-
36
-
37
-
38
-
39
-
40
-
41
-
42
-
43
-
44
-
45
-
46
-
47
-
48
-
49
-
50
-
51
-
52
-
53
-
54
-
55
-
56
-
57
-
58
-
59
-
60
-
61
-
62
-
63
-
64
-
65
-
66
-
67
-
68
-
69
-
70
-
71
-
72
-
73
-
74
-
75
-
76
-
77
-
78
-
79
-
80
-
81
-
82
-
83
-
84
-
85
-
86
-
87
-
88
-
89
-
90
-
91
-
92
-
93
-
94
-
95
-
96
-
97
-
98
-
99
-
100
-
101
-
102
-
103
-
104
-
105
-
106
-
107
-
108
-
109
-
110
-
111
-
112
-
113
-
114
-
115
-
116
-
117
-
118
-
119
-
120
-
121
-
122
-
123
-
 124
124 -
 125
125 -
 126
126 -
 127
127 -
 128
128 -
 129
129 -
 130
130 -
 131
131 -
 132
132 -
 133
133 -
 134
134 -
135
-
136
-
137
-
138
-
139
-
140
-
141
-
142
-
143
-
144
-
145
-
146
-
147
-
148
-
149
-
150
-
151
-
152
-
153
-
154
 |
 |