Dell OptiPlex VDI Blaster Edition Dell OptiPlex FX130 and FX170 Re-Imaging Gui - Page 13
Using the Re-Imaging Utility to Update, BIOS on the Thin Client
 |
View all Dell OptiPlex VDI Blaster Edition manuals
Add to My Manuals
Save this manual to your list of manuals |
Page 13 highlights
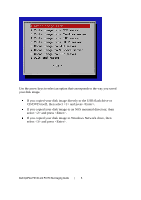
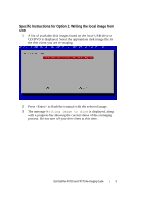
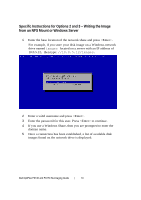
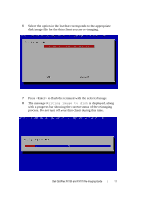
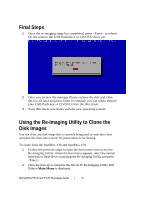
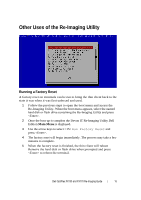
3 Use the arrow keys to select an option that corresponds to the server you wish to clone the disk image to. There are three choices available. To clone the disk image to an NFS mounted server, select and press . To clone the disk image to Windows Share Network, select and press . To clone the disk image to an FTP server, select and press . 4 If you are asked for credentials, you will need to enter a valid username, password and, in the case of a Windows Share, a domain name. 5 Once a connection has been established, the image cloning will begin. A progress bar will display the current status of the cloning process. Do not turn off your thin client during this time. 6 When the cloning is complete, the Re-Imaging Utility will return itself to the Main Menu. Using the Re-Imaging Utility to Update BIOS on the Thin Client Writing the BIOS to the Thin Client When writing the BIOS onto the thin client, the BIOS itself must be on the same hard disk or flash drive that contains the Re-Imaging Utility. NOTE: BIOS images are available on support.dell.com. 1 Follow the previous steps to open the boot menu and access the Re-Imaging Utility. When the boot menu appears, select the named hard disk or flash drive containing the Re-Imaging Utility and press . 2 Once the boot up is complete the Devon IT Re-Imaging Utility Dell Edition Main Menu is displayed. 3 Use the arrow keys to select Write BIOS Image and press . Dell OptiPlex FX130 and FX170 Re-Imaging Guide | 13
-
 1
1 -
2
-
3
-
4
-
5
-
6
-
7
-
 8
8 -
 9
9 -
 10
10 -
 11
11 -
 12
12 -
 13
13 -
 14
14 -
 15
15 -
 16
16 -
 17
17 -
 18
18
 |
 |