Dell OptiPlex VDI Blaster Edition Dell OptiPlex FX130 and FX170 Re-Imaging Gui - Page 14
Specific Instructions for Backing up the BIOS
 |
View all Dell OptiPlex VDI Blaster Edition manuals
Add to My Manuals
Save this manual to your list of manuals |
Page 14 highlights
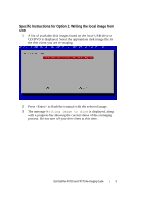
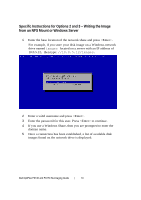
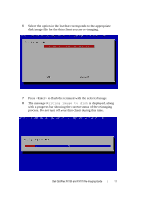
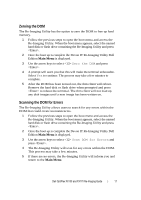
4 You will be asked if you wish to back up the current BIOS. Select Yes if you wish to keep a back up. 5 A list of available BIOS images found on the hard disk or flash drive will be displayed. Select the appropriate BIOS. Only BIOS images that correspond to the terminal will appear. 6 Press to begin the writing process. You will be asked if you wish to preserve the Terminal's Vital Data. It is highly recommended that you select Yes to preserve the UUID of the terminal. 7 Once the writing process has finished, you will be taken back to the Main Menu. Specific Instructions for Backing up the BIOS The BIOS that is currently on the terminal can have a back up created, in case of an emergency. 1 Follow the previous steps to open the boot menu and access the Re-Imaging Utility. When the boot menu appears, select the named hard disk or flash drive containing the Re-Imaging Utility and press . 2 Once the boot up is complete the Devon IT Re-Imaging Utility Dell Edition Main Menu is displayed. 3 Use the arrow keys to select Backup BIOS Image and press . 4 The Re-Imaging Utility will ask you to name the BIOS. Type in the name you wish to give the back up BIOS and press to continue with the back up process. 5 Once the back up has completed, the back up BIOS file will be stored in the hard disk or flash drive, and you will be taken back to the main menu of the Re-Imaging Utility. Dell OptiPlex FX130 and FX170 Re-Imaging Guide | 14
-
 1
1 -
2
-
3
-
4
-
5
-
6
-
7
-
8
-
 9
9 -
 10
10 -
 11
11 -
 12
12 -
 13
13 -
 14
14 -
 15
15 -
 16
16 -
 17
17 -
 18
18
 |
 |