Dell OptiPlex VDI Blaster Edition Dell OptiPlex FX130 and FX170 Re-Imaging Gui - Page 17
Zeroing the DOM, Scanning the DOM for Errors
 |
View all Dell OptiPlex VDI Blaster Edition manuals
Add to My Manuals
Save this manual to your list of manuals |
Page 17 highlights
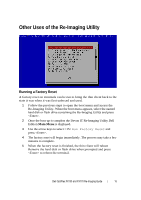
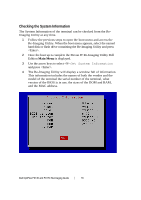
Zeroing the DOM The Re-Imaging Utility has the option to zero the DOM to free up hard memory. 1 Follow the previous steps to open the boot menu and access the Re-Imaging Utility. When the boot menu appears, select the named hard disk or flash drive containing the Re-Imaging Utility and press . 2 Once the boot up is complete the Devon IT Re-Imaging Utility Dell Edition Main Menu is displayed. 3 Use the arrow keys to select Zero the DOM and press . 4 A prompt will warn you that this will make the terminal unbootable. Select Yes to continue. The process may take a few minutes to complete. 5 After the DOM has been zeroed out, the thin client will reboot. Remove the hard disk or flash drive when prompted and press to reboot the terminal. The thin client will not load up any disk images until a new image has been written on. Scanning the DOM for Errors The Re-Imaging Utility allows users to search for any errors within the DOM that could create inconsistencies. 1 Follow the previous steps to open the boot menu and access the Re-Imaging Utility. When the boot menu appears, select the named hard disk or flash drive containing the Re-Imaging Utility and press . 2 Once the boot up is complete the Devon IT Re-Imaging Utility Dell Edition Main Menu is displayed. 3 Use the arrow keys to select Scan DOM for Errors and press . 4 The Re-Imaging Utility will scan for any errors within the DOM. This process may take a few minutes. 5 If there are no errors, the Re-Imaging Utility will inform you and return to the Main Menu. Dell OptiPlex FX130 and FX170 Re-Imaging Guide | 17
-
 1
1 -
2
-
3
-
4
-
5
-
6
-
7
-
8
-
9
-
10
-
11
-
 12
12 -
 13
13 -
 14
14 -
 15
15 -
 16
16 -
 17
17 -
 18
18
 |
 |