Dell PowerConnect B-RX8 Installation Guide - Page 169
Secure the fan to the chassis by tightening the four captive screws.
 |
View all Dell PowerConnect B-RX8 manuals
Add to My Manuals
Save this manual to your list of manuals |
Page 169 highlights
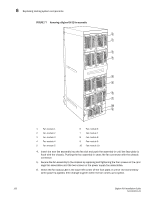
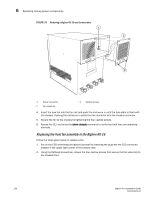
Replacing cooling system components 6 FIGURE 80 Removing a fan from a BigIron RX-4 switch 1 2 1 Latch release 2 Fan tray assembly FIGURE 81 Removing a fan from a BigIron RX-8 switch 1 2 1 Latch release 2 Fan tray assembly 4. Insert the new fan assembly into the fan slot and push the enclosure in until the face plate is flush with the chassis. Pushing the enclosure in seats the fan connector with the chassis connector. 5. Secure the fan to the chassis by tightening the four captive screws. BigIron RX Installation Guide 157 53-1001811-01
-
 1
1 -
2
-
3
-
4
-
5
-
6
-
7
-
8
-
9
-
10
-
11
-
12
-
13
-
14
-
15
-
16
-
17
-
18
-
19
-
20
-
21
-
22
-
23
-
24
-
25
-
26
-
27
-
28
-
29
-
30
-
31
-
32
-
33
-
34
-
35
-
36
-
37
-
38
-
39
-
40
-
41
-
42
-
43
-
44
-
45
-
46
-
47
-
48
-
49
-
50
-
51
-
52
-
53
-
54
-
55
-
56
-
57
-
58
-
59
-
60
-
61
-
62
-
63
-
64
-
65
-
66
-
67
-
68
-
69
-
70
-
71
-
72
-
73
-
74
-
75
-
76
-
77
-
78
-
79
-
80
-
81
-
82
-
83
-
84
-
85
-
86
-
87
-
88
-
89
-
90
-
91
-
92
-
93
-
94
-
95
-
96
-
97
-
98
-
99
-
100
-
101
-
102
-
103
-
104
-
105
-
106
-
107
-
108
-
109
-
110
-
111
-
112
-
113
-
114
-
115
-
116
-
117
-
118
-
119
-
120
-
121
-
122
-
123
-
124
-
125
-
126
-
127
-
128
-
129
-
130
-
131
-
132
-
133
-
134
-
135
-
136
-
137
-
138
-
139
-
140
-
141
-
142
-
143
-
144
-
145
-
146
-
147
-
148
-
149
-
150
-
151
-
152
-
153
-
154
-
155
-
156
-
157
-
158
-
159
-
160
-
161
-
162
-
163
-
 164
164 -
 165
165 -
 166
166 -
 167
167 -
 168
168 -
 169
169 -
 170
170 -
 171
171 -
 172
172 -
 173
173 -
 174
174 -
175
-
176
-
177
-
178
-
179
-
180
-
181
-
182
-
183
-
184
-
185
-
186
-
187
-
188
-
189
-
190
-
191
-
192
-
193
-
194
-
195
-
196
-
197
-
198
-
199
-
200
-
201
-
202
-
203
-
204
-
205
-
206
-
207
-
208
-
209
-
210
-
211
-
212
-
213
-
214
-
215
-
216
-
217
-
218
-
219
-
220
-
221
-
222
-
223
-
224
-
225
-
226
-
227
-
228
-
229
-
230
-
231
-
232
-
233
-
234
-
235
-
236
-
237
-
238
-
239
-
240
 |
 |

BigIron RX Installation Guide
157
53-1001811-01
Replacing cooling system components
6
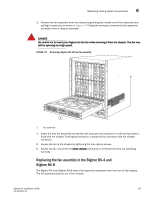
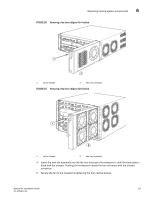
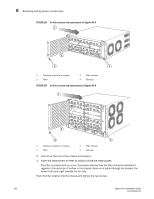
FIGURE 80
Removing a fan from a BigIron RX-4 switch
FIGURE 81
Removing a fan from a BigIron RX-8 switch
4.
Insert the new fan assembly into the fan slot and push the enclosure in until the face plate is
flush with the chassis. Pushing the enclosure in seats the fan connector with the chassis
connector.
5.
Secure the fan to the chassis by tightening the four captive screws.
1
Latch release
2
Fan tray assembly
1
Latch release
2
Fan tray assembly
1
2
2
1