Dell PowerConnect Brocade 815 Brocade Adapters Installation and Reference Manu - Page 196
Using a LiveCD image
 |
View all Dell PowerConnect Brocade 815 manuals
Add to My Manuals
Save this manual to your list of manuals |
Page 196 highlights
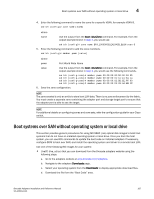
4 Boot systems over SAN without operating system or local drive • WinPE ISO image that you can create for x86 and x64 platform. You can use a WinPE image to boot UEFI-based systems. To create these images, refer to "Creating a WinPE image" on page 169. For more detailed procedures to create a bootable CD or USB drive from the ISO image, refer to documentation for your CD or USB drive burning software. As an example of open source USB burning software for bootable Live USB drives, refer to http://unetbootin.sourceforge.net. For details on booting your operating system from a CD, DVD, or USB drive, refer to your host system documentation and online help. Using a LiveCD image NOTE The following procedures assume that the Brocade adapter has been installed in the host system. 1. For BIOS-based systems, obtain the LiveCD image from the Brocade adapters website using the following steps. a. Go to the adapters website at www.brocade.com/adapters. b. Navigate to the adapters Downloads page. c. Select your operating system from the Downloads list to display appropriate download files. d. Download the file from the "Boot Code" area. NOTE For UEFI-based systems, create a WinPE image for your system using steps under "Creating a WinPE image" on page 169. 2. Create a bootable CD or USB drive using the ISO image. Refer to the documentation for your CD or USB drive burning software for details. As an example of open source USB burning software for bootable Live USB drives, refer to http://unetbootin.sourceforge.net. 3. Install the CD into the CD/DVD ROM drive or USB drive into a USB port and boot the system. 4. When self-testing completes, access you system's boot manager menu and select the option to boot from the appropriate CD or USB drive. 5. Follow on-screen prompts and instructions to boot from the CD or USB drive. 6. Access your system's command shell so that you can use BCU commands. (Refer to "Using BCU commands" on page 53 for more information.) 7. To update adapter boot code, refer to steps under "Updating boot code with BCU commands" on page 120. 8. To configure boot from SAN on an installed adapter, refer to "Configuring boot over SAN" on page 131 and "Configuring BIOS using HCM or BCU commands" on page 142. 9. To install the operating system and driver to a remote boot LUN, refer to "Configuring boot over SAN" on page 131 and "Operating system and driver installation on boot LUNs" on page 148. 168 Brocade Adapters Installation and Reference Manual 53-1002144-01
-
 1
1 -
2
-
3
-
4
-
5
-
6
-
7
-
8
-
9
-
10
-
11
-
12
-
13
-
14
-
15
-
16
-
17
-
18
-
19
-
20
-
21
-
22
-
23
-
24
-
25
-
26
-
27
-
28
-
29
-
30
-
31
-
32
-
33
-
34
-
35
-
36
-
37
-
38
-
39
-
40
-
41
-
42
-
43
-
44
-
45
-
46
-
47
-
48
-
49
-
50
-
51
-
52
-
53
-
54
-
55
-
56
-
57
-
58
-
59
-
60
-
61
-
62
-
63
-
64
-
65
-
66
-
67
-
68
-
69
-
70
-
71
-
72
-
73
-
74
-
75
-
76
-
77
-
78
-
79
-
80
-
81
-
82
-
83
-
84
-
85
-
86
-
87
-
88
-
89
-
90
-
91
-
92
-
93
-
94
-
95
-
96
-
97
-
98
-
99
-
100
-
101
-
102
-
103
-
104
-
105
-
106
-
107
-
108
-
109
-
110
-
111
-
112
-
113
-
114
-
115
-
116
-
117
-
118
-
119
-
120
-
121
-
122
-
123
-
124
-
125
-
126
-
127
-
128
-
129
-
130
-
131
-
132
-
133
-
134
-
135
-
136
-
137
-
138
-
139
-
140
-
141
-
142
-
143
-
144
-
145
-
146
-
147
-
148
-
149
-
150
-
151
-
152
-
153
-
154
-
155
-
156
-
157
-
158
-
159
-
160
-
161
-
162
-
163
-
164
-
165
-
166
-
167
-
168
-
169
-
170
-
171
-
172
-
173
-
174
-
175
-
176
-
177
-
178
-
179
-
180
-
181
-
182
-
183
-
184
-
185
-
186
-
187
-
188
-
189
-
190
-
 191
191 -
 192
192 -
 193
193 -
 194
194 -
 195
195 -
 196
196 -
 197
197 -
 198
198 -
 199
199 -
 200
200 -
 201
201 -
202
-
203
-
204
-
205
-
206
-
207
-
208
-
209
-
210
-
211
-
212
-
213
-
214
-
215
-
216
-
217
-
218
-
219
-
220
-
221
-
222
-
223
-
224
-
225
-
226
-
227
-
228
-
229
-
230
-
231
-
232
-
233
-
234
-
235
-
236
-
237
-
238
-
239
-
240
-
241
-
242
-
243
-
244
-
245
-
246
-
247
-
248
-
249
-
250
-
251
-
252
-
253
-
254
-
255
-
256
-
257
-
258
-
259
-
260
-
261
-
262
-
263
-
264
-
265
-
266
-
267
-
268
-
269
-
270
-
271
-
272
 |
 |
