Dell PowerConnect W-Airwave W-Airwave 7.1 User Guide - Page 19
Previous AWMS Installations, Step 2: Installing AWMS Software, Including AWMS
 |
View all Dell PowerConnect W-Airwave manuals
Add to My Manuals
Save this manual to your list of manuals |
Page 19 highlights
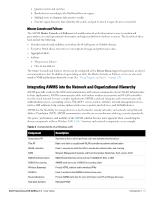
Caution: Changing these settings after the installation can cause a loss of graphical data, and you should avoid delayed configuration. 2. Press 1 to complete the configuration of date and time information, and to continue to the next step. Previous AWMS Installations The following message appears after date and time are set. Welcome to AWMS Installer Phase 2 STEP 1: Checking for previous AWMS installations If a previous version of AWMS software is not discovered, the installation program automatically proceeds to "Step 2: Installing AWMS Software, Including AWMS" on page 19. If a previous version of the software is discovered, the following message appears on the screen. The installation program discovered a previous version of the software. Would you like to reinstall AWMS? This will erase AWMS's database. Reinstall (y/n)? 1. Type y and press Enter to proceed. Caution: This action erases the current database, including all historical information. To ensure that the AWMS database is backed up prior to reinstallation, answer `n` at the prompt above and contact your Value Added Reseller or directly contact Dell support. Step 2: Installing AWMS Software, Including AWMS The following message appears while AWMS software is transferred and compiled. STEP 2: Installing AWMS software This will take a few minutes. Press Alt-F9 to see detailed messages. Press Alt-F1 return to this screen. This step requires no user input, but you have the option of monitoring progress in more detail should you wish to do so: To view detailed output from the AWMS software installer, press Alt-F9 or Ctrl-Alt-F9. Pressing Alt-F1 or Ctrl-Alt-F1 returns you to the main console. Step 3: Checking the AWMS Installation After the AWMS software installation is complete, the following message appears: STEP 3: Checking AWMS installation Database is up. AWMS is running version: (version number) This step requires no user input. Proceed to the next step as prompted to do so. Step 4: Assigning an IP Address to the AWMS System While the AWMS primary network interface accepts a DHCP address initially during installation, AWMS does not function when launched unless a static IP is assigned. Complete these tasks to assign the static IP address. The following message appears: Dell PowerConnect W AirWave 7.1 | User Guide Installing AWMS | 19
-
 1
1 -
2
-
3
-
4
-
5
-
6
-
7
-
8
-
9
-
10
-
11
-
12
-
13
-
 14
14 -
 15
15 -
 16
16 -
 17
17 -
 18
18 -
 19
19 -
 20
20 -
 21
21 -
 22
22 -
 23
23 -
 24
24 -
25
-
26
-
27
-
28
-
29
-
30
-
31
-
32
-
33
-
34
-
35
-
36
-
37
-
38
-
39
-
40
-
41
-
42
-
43
-
44
-
45
-
46
-
47
-
48
-
49
-
50
-
51
-
52
-
53
-
54
-
55
-
56
-
57
-
58
-
59
-
60
-
61
-
62
-
63
-
64
-
65
-
66
-
67
-
68
-
69
-
70
-
71
-
72
-
73
-
74
-
75
-
76
-
77
-
78
-
79
-
80
-
81
-
82
-
83
-
84
-
85
-
86
-
87
-
88
-
89
-
90
-
91
-
92
-
93
-
94
-
95
-
96
-
97
-
98
-
99
-
100
-
101
-
102
-
103
-
104
-
105
-
106
-
107
-
108
-
109
-
110
-
111
-
112
-
113
-
114
-
115
-
116
-
117
-
118
-
119
-
120
-
121
-
122
-
123
-
124
-
125
-
126
-
127
-
128
-
129
-
130
-
131
-
132
-
133
-
134
-
135
-
136
-
137
-
138
-
139
-
140
-
141
-
142
-
143
-
144
-
145
-
146
-
147
-
148
-
149
-
150
-
151
-
152
-
153
-
154
-
155
-
156
-
157
-
158
-
159
-
160
-
161
-
162
-
163
-
164
-
165
-
166
-
167
-
168
-
169
-
170
-
171
-
172
-
173
-
174
-
175
-
176
-
177
-
178
-
179
-
180
-
181
-
182
-
183
-
184
-
185
-
186
-
187
-
188
-
189
-
190
-
191
-
192
-
193
-
194
-
195
-
196
-
197
-
198
-
199
-
200
-
201
-
202
-
203
-
204
-
205
-
206
-
207
-
208
-
209
-
210
-
211
-
212
-
213
-
214
-
215
-
216
-
217
-
218
-
219
-
220
-
221
-
222
-
223
-
224
-
225
-
226
-
227
-
228
-
229
-
230
-
231
-
232
-
233
-
234
-
235
-
236
-
237
-
238
-
239
-
240
-
241
-
242
-
243
-
244
-
245
-
246
-
247
-
248
-
249
-
250
-
251
-
252
-
253
-
254
-
255
-
256
-
257
-
258
-
259
-
260
-
261
-
262
-
263
-
264
-
265
-
266
-
267
-
268
-
269
-
270
-
271
-
272
-
273
-
274
-
275
-
276
-
277
-
278
-
279
-
280
-
281
-
282
-
283
-
284
-
285
-
286
-
287
-
288
-
289
-
290
-
291
-
292
-
293
-
294
-
295
-
296
-
297
-
298
-
299
-
300
-
301
-
302
-
303
-
304
-
305
-
306
-
307
-
308
-
309
-
310
-
311
-
312
-
313
-
314
-
315
-
316
-
317
-
318
-
319
-
320
-
321
-
322
-
323
-
324
-
325
-
326
-
327
-
328
-
329
-
330
-
331
-
332
-
333
-
334
 |
 |
