Dell PowerEdge 1300 Dell PowerEdge Systems Microprocessor Upgrade Guide - Page 11
Installing Upgrade Microprocessors in the PowerEdge 4300, Installing a New Cooling Shroud - pentium iii
 |
View all Dell PowerEdge 1300 manuals
Add to My Manuals
Save this manual to your list of manuals |
Page 11 highlights
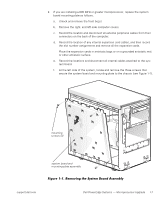
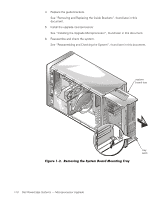
g. Slide the system board and mounting plate assembly forward about 12.7 millimeters (mm) (0.5 inch), rotate it away from the top of the chassis, and lift it out of the chassis. h. Lay the assembly with the system board facing up on a flat surface. i. Remove the mounting screw from the mounting plate. j. Slide the system board about 6.3 mm (0.25 inch) toward the front (left edge of the mounting plate) and lift the system board up and away from the mounting plate. 3. To install the replacement mounting plate assembly (provided in your upgrade kit) in your PowerEdge 2300 system, perform the preceding steps in reverse order. 4. Remove the microprocessor. See "Removing the Microprocessors", found later in this document. 5. Remove the cooling shroud. See "Removing and Replacing the Cooling Shroud", found later in this document. 6. Install the upgrade microprocessor. See "Installing the Upgrade Microprocessor", found later in this document. 7. Replace the cooling shroud. See "Removing and Replacing the Cooling Shroud", found later in this document. If the upgrade kit comes with a new cooling shroud, you must install the new cooling shroud. See "Installing a New Cooling Shroud", found later in this document. 8. Reassemble and check the system. See "Reassembling and Checking the System", found later in this document. To upgrade to Pentium II or Pentium III microprocessors in the PowerEdge 4300, perform the following steps. NOTES: If you are installing a 600-MHz (or greater) microprocessor in your PowerEdge 4300, the system board mounting tray must be replaced. A replacement mounting tray is provided with the upgrade kit. If you are upgrading a PowerEdge 4300 with a microprocessor with an operating frequency less than 600 MHz, you do not need to replace the system board mounting tray. 1-8 Dell PowerEdge Systems - Microprocessor Upgrade
-
 1
1 -
2
-
3
-
4
-
5
-
 6
6 -
 7
7 -
 8
8 -
 9
9 -
 10
10 -
 11
11 -
 12
12 -
 13
13 -
 14
14 -
 15
15 -
 16
16 -
17
-
18
-
19
-
20
-
21
-
22
-
23
 |
 |