Dell PowerEdge 1300 Dell PowerEdge Systems Microprocessor Upgrade Guide - Page 8
Chassis Intrusion, Not Detected, Removing and Replacing the Guide Brackets - cover
 |
View all Dell PowerEdge 1300 manuals
Add to My Manuals
Save this manual to your list of manuals |
Page 8 highlights
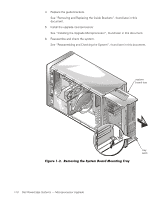
3. Remove and replace the guide brackets. See "Removing and Replacing the Guide Brackets", found later in this document. 4. Remove the cooling shroud. See "Removing and Replacing the Cooling Shroud", found later in this document. 5. Install the upgrade microprocessor. See "Installing the Upgrade Microprocessors", found later in this document. 6. Replace the cooling shroud. See "Removing and Replacing the Cooling Shroud", found later in this document. If the upgrade kit comes with a new cooling shroud, you must install the new cooling shroud. See "Installing a New Cooling Shroud", found later in this document. 7. Reassemble and check the system, as follows: a. Rotate the power supply back into position, making sure that the securing tab snaps into place. b. Replace the covers and front bezel. Reconnect your computer and peripherals to their power sources and turn them on. As the system boots, it detects the presence of the new microprocessor and automatically changes the system configuration information in the System Setup program. NOTE: After you remove and replace the cover of a PowerEdge 1300 system, the chassis intrusion detector causes the following message to be displayed at the next system start-up: ALERT! Cover was previously removed. c. Enter the System Setup program and confirm that the top line in the system data area correctly identifies the installed microprocessor(s). By default, the serial numbers of Pentium III microprocessors are not displayed. See the procedures in "Using the System Setup Program" in your User's Guide for accessing and modifying entries in the System Setup screens. d. Reset the chassis intrusion detector while in the System Setup program by changing Chassis Intrusion to Not Detected. NOTE: If a setup password has been assigned by someone else, contact your network administrator for information on resetting the chassis intrusion detector. support.dell.com Dell PowerEdge Systems - Microprocessor Upgrade 1-5
-
 1
1 -
2
-
 3
3 -
 4
4 -
 5
5 -
 6
6 -
 7
7 -
 8
8 -
 9
9 -
 10
10 -
 11
11 -
 12
12 -
 13
13 -
14
-
15
-
16
-
17
-
18
-
19
-
20
-
21
-
22
-
23
 |
 |