Dell PowerEdge 1300 Dell PowerEdge Systems Microprocessor Upgrade Guide - Page 22
Using the System Setup Program, Installing Upgrade Microprocessors
 |
View all Dell PowerEdge 1300 manuals
Add to My Manuals
Save this manual to your list of manuals |
Page 22 highlights
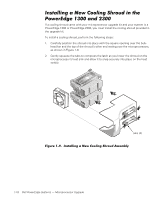
To reassemble the system and perform verification checks, perform the following steps. NOTE: The following procedures apply to PowerEdge 2300, 4300, and 4350 systems. For PowerEdge 1300 systems, see step 7 under "Installing Upgrade Microprocessors in the PowerEdge 1300", found earlier in this document. 1. Close the computer panel doors (for PowerEdge 4350 systems only) or replace the covers and front bezel, and reconnect your computer and peripherals to their power sources and turn them on. As the system boots, it detects the presence of the new microprocessor and automatically changes the system configuration information in the System Setup program. The following message appears: Second processor detected 2. Enter the System Setup program and confirm that the top line in the system data area correctly identifies the installed microprocessor(s). By default, the serial numbers of Pentium III microprocessors are not displayed. See the procedures in "Using the System Setup Program" in your User's Guide for accessing and modifying entries in the System Setup screens. Reset the chassis intrusion detector while in the System Setup program by changing Chassis Intrusion to Not Detected. NOTE: If a setup password has been assigned by someone else, contact your network administrator for information on resetting the chassis intrusion detector. 3. Run the Dell Diagnostics to verify that the new microprocessor is operating correctly. See your User's Guide and your Installation and Troubleshooting Guide for additional information on running the Dell Diagnostics and troubleshooting any problems that may occur. support.dell.com Dell PowerEdge Systems - Microprocessor Upgrade 1-19
-
 1
1 -
2
-
3
-
4
-
5
-
6
-
7
-
8
-
9
-
10
-
11
-
12
-
13
-
14
-
15
-
16
-
 17
17 -
 18
18 -
 19
19 -
 20
20 -
 21
21 -
 22
22 -
 23
23
 |
 |