Dell PowerEdge 1300 Dell PowerEdge Systems Microprocessor Upgrade Guide - Page 7
Updating the BIOS, Saving RCU Configuration Settings - remove the computer cover
 |
View all Dell PowerEdge 1300 manuals
Add to My Manuals
Save this manual to your list of manuals |
Page 7 highlights
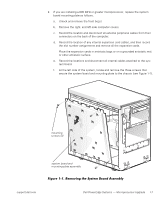
If a BIOS diskette is included with your kit, update your BIOS with the version contained on that diskette by performing the following steps. The latest version of the BIOS is also available online at http://support.dell.com. 1. Insert the BIOS diskette provided in the upgrade kit into the diskette drive. 2. Reboot the system. 3. After the system completes the boot routine, follow the instructions on the screen. 4. After the BIOS has been successfully installed message appears on the screen, remove the BIOS diskette from the diskette drive and follow the instructions on the screen to reboot the system. Use the RCU to save the current system configuration settings by performing the following steps: 1. Insert the RCU diskette into the diskette drive and reboot the system. 2. When the welcome screen appears, press . The main menu appears. 3. Select Step 5: Save and Exit, and then follow the online instructions to save the current system configuration information. NOTE: The RCU recognizes microprocessors operating at 450 MHz and faster. The latest version of the RCU is available online at http://support.dell.com. To upgrade to Pentium II or Pentium III microprocessors in the PowerEdge 1300, perform the following steps: 1. Access the system board, which involves the following steps: a. Disconnecting power and peripheral cables. b. Removing the covers. c. Rotating the power supply. See your system Installation and Troubleshooting Guide for instructions. 2. Remove the microprocessors. See "Removing the Microprocessors", found later in this document. 1-4 Dell PowerEdge Systems - Microprocessor Upgrade
-
 1
1 -
 2
2 -
 3
3 -
 4
4 -
 5
5 -
 6
6 -
 7
7 -
 8
8 -
 9
9 -
 10
10 -
 11
11 -
 12
12 -
13
-
14
-
15
-
16
-
17
-
18
-
19
-
20
-
21
-
22
-
23
 |
 |