Dell PowerEdge 1655MC Replacing the Server Module Board - Page 14
Removing a Processor
 |
View all Dell PowerEdge 1655MC manuals
Add to My Manuals
Save this manual to your list of manuals |
Page 14 highlights
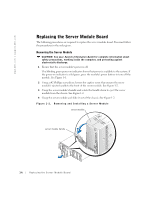
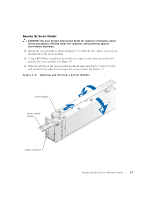
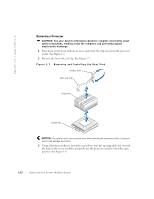
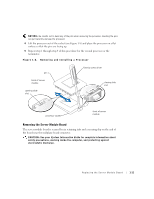
www.dell.com | support.dell.com Removing a Processor CAUTION: See your System Information Guide for complete information about safety precautions, working inside the computer, and protecting against electrostatic discharge. 1 Press down on the heat-sink release lever and rotate the clip away from the processor socket. See Figure 1-7. 2 Remove the heat sink and clip. See Figure 1-7. Figure 1-7. Removing and Installing the Heat Sink release lever heat-sink clip heat sink socket tab NOTICE: Be careful not to use excessive force when opening the processor socket. Excessive force could damage the socket. 3 Using a flat-tip screwdriver, insert the screwdriver into the opening slide slot (toward the back of the server module) and gently pry the processor socket to the fully open position. See Figure 1-8. 1-10 Replacing the Server Module Board
-
 1
1 -
2
-
3
-
4
-
5
-
6
-
7
-
8
-
 9
9 -
 10
10 -
 11
11 -
 12
12 -
 13
13 -
 14
14 -
 15
15 -
 16
16 -
 17
17 -
 18
18 -
 19
19 -
20
-
21
-
22
-
23
-
24
 |
 |