Dell PowerEdge 1655MC Replacing the Server Module Board - Page 19
Verifying the System Setup Options - manual
 |
View all Dell PowerEdge 1655MC manuals
Add to My Manuals
Save this manual to your list of manuals |
Page 19 highlights
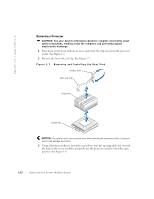
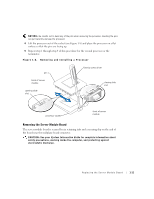
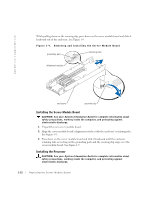
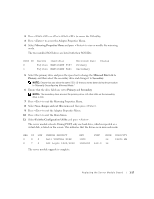
Installing a Server Module 1 Slide the server module into the chassis until it stops. 2 Rotate the server module's handle up to fully seat the server module. See Figure 1-2. 3 Using a#2 Phillips screwdriver, tighten the captive screw that secure the handle to the front of the server module. See Figure 1-2. The server module board upgrade is complete. 4 If the server module was configured with one hard drive or two hard drives in nonmirrored mode or the server module was configured in mirrored mode and the message Logical drive optimal was displayed, go to "Verifying the System Setup Options." If the server module was configured in mirrored mode and the message Logical drive resynchronizing was displayed, go to "Manually Configuring the Mirroring Mode." Verifying the System Setup Options NOTE: If you are using the PERC 4/im DOS Utility diskette, go to "Running the PERC 4/im DOS Utility." If only one drive or two drives are installed in nonmirrored mode, go to step 1. 1 Turn on the server module. See Figure 1-1. If the server module does not turn on, see "Getting Help" in your Installation and Troubleshooting Guide. 2 Enter the System Setup program. 3 Ensure that the processor, memory, and service tag information is correct. The service tag should match the service tag written on the server module's handle. If the service tag information is not correct, see "Programming the Service Tag." 4 Press to exit the System Setup program. NOTE: The server module upgrade is complete if only one hard drive was installed or if there were two hard drives installed without the mirror mode enabled. Replacing the Ser ver Module Board 1-15
-
 1
1 -
2
-
3
-
4
-
5
-
6
-
7
-
8
-
9
-
10
-
11
-
12
-
13
-
 14
14 -
 15
15 -
 16
16 -
 17
17 -
 18
18 -
 19
19 -
 20
20 -
 21
21 -
 22
22 -
 23
23 -
 24
24
 |
 |