Dell PowerEdge 1655MC Replacing the Server Module Board - Page 15
Removing the Server Module Board
 |
View all Dell PowerEdge 1655MC manuals
Add to My Manuals
Save this manual to your list of manuals |
Page 15 highlights
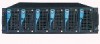
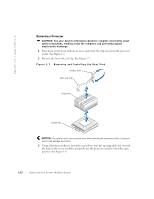
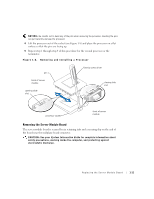
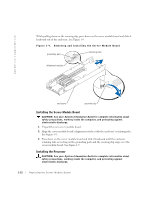
NOTICE: Be careful not to bend any of the pins when removing the processor. Bending the pins can permanently damage the processor. 4 Lift the processor out of the socket (see Figure 1-8) and place the processor on a flat surface so that the pins are facing up. 5 Repeat step 1 through step 4 of this procedure for the second processor or the terminator. Figure 1-8. Removing and Installing a Processor pin 1 flat-tip screw driver back of server module opening slide slot closing slide slot processor socket front of server module Removing the Server Module Board The server module board is secured by six retaining tabs and a securing clip on the end of the board near the midplane board connector. CAUTION: See your System Information Guide for complete information about safety precautions, working inside the computer, and protecting against electrostatic discharge. Replacing the Ser ver Module Board 1-11
-
 1
1 -
2
-
3
-
4
-
5
-
6
-
7
-
8
-
9
-
 10
10 -
 11
11 -
 12
12 -
 13
13 -
 14
14 -
 15
15 -
 16
16 -
 17
17 -
 18
18 -
 19
19 -
 20
20 -
21
-
22
-
23
-
24
 |
 |