Dell PowerEdge 2550 Rack Installation Guide - Page 11
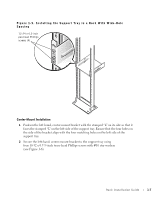
Flush-Mount Installation
 |
View all Dell PowerEdge 2550 manuals
Add to My Manuals
Save this manual to your list of manuals |
Page 11 highlights
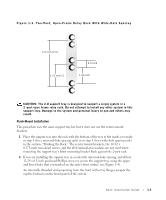
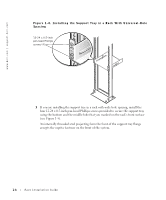
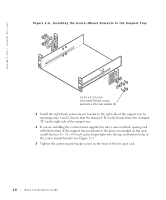
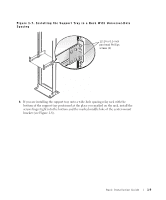
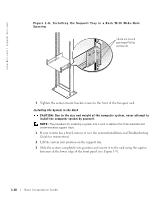
Figure 1-3. Two-Post, Open-Frame Relay Rack With Wide-Hole Spacing 3.5 inch (2 U) 1.75 inch (1 0.5 inch 1.25 inch CAUTION: The 2-U support tray is designed to support a single system in a 2 -post open frame relay rack. Do not attempt to install any other system in this support tray. Damage to the system and personal injury to you and others may result. Flush-Mount Installation This procedure uses the same support tray kit, but it does not use the center-mount brackets. 1 Place the support tray into the rack with the bottom of the tray at the marks you made in step 4 (for a universal-hole spacing rack) or in step 5 (for a wide-hole spacing rack) in the section, "Marking the Rack." The center-mount brackets, the 10-32 x 0.375-inch truss-head screws, and the #10 internal-star washers are not used when mounting the support tray's front mounting bracket flush against the 2-post rack. 2 If you are installing the support tray in a rack with universal-hole spacing, install four 12-24 x 0.5-inch pan-head Phillips screws to secure the support tray using the upper and lower holes that you marked on the rack's front surface (see Figure 1-4). An internally threaded stud projecting from the front of the tray flanges accepts the captive fasteners on the front panel of the system. Rack Installation Guide 1-5
-
 1
1 -
2
-
3
-
4
-
5
-
 6
6 -
 7
7 -
 8
8 -
 9
9 -
 10
10 -
 11
11 -
 12
12 -
 13
13 -
 14
14 -
 15
15 -
 16
16 -
17
-
18
-
19
-
20
-
21
-
22
-
23
-
24
-
25
-
26
-
27
-
28
-
29
-
30
-
31
-
32
-
33
-
34
-
35
-
36
-
37
-
38
-
39
-
40
 |
 |
