Dell PowerEdge 2550 Rack Installation Guide - Page 19
Recommended Tools and Supplies, Two-Post RapidRails Rack Installation Tasks, Marking the Rack - drivers
 |
View all Dell PowerEdge 2550 manuals
Add to My Manuals
Save this manual to your list of manuals |
Page 19 highlights
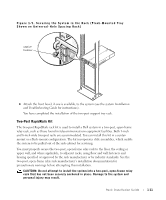
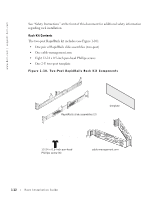
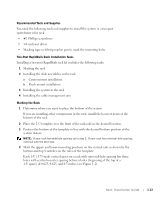
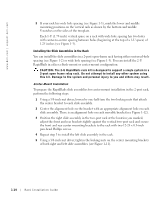
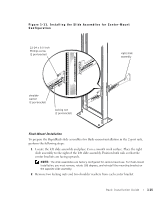
Recommended Tools and Supplies You need the following tools and supplies to install the system in a two-post open-frame relay rack: • #2 Phillips screwdriver • 3/8-inch nut driver • Masking tape or felt-tip marker pen to mark the mounting holes Two-Post RapidRails Rack Installation Tasks Installing a two-post RapidRails rack kit includes the following tasks: 1 Marking the rack 2 Installing the slide assemblies in the rack a Center mount installation b Flush mount installation 3 Installing the system in the rack 4 Installing the cable management arm Marking the Rack 1 Determine where you want to place the bottom of the system. If you are installing other components in the rack, install the heaviest items at the bottom of the rack. 2 Place the 2-U template over the front of the rack rails in the desired location. 3 Position the bottom of the template in line with the desired bottom position of the system chassis. NOTE: If your rack has wide hole spacing, go to step 5. If your rack has universal-hole spacing, continue with the next step. 4 Mark the upper- and lower-mounting positions on the vertical rails as shown by the bottom and top V-notches on the sides of the template. Each 1-U (1.75-inch) vertical space on a rack with universal-hole spacing has three holes with center-to-center spacing between holes (beginning at the top of a 1-U space) of 0.625, 0.625, and 0.5 inches (see Figure 1-2). Rack Installation Guide 1-13
-
 1
1 -
2
-
3
-
4
-
5
-
6
-
7
-
8
-
9
-
10
-
11
-
12
-
13
-
 14
14 -
 15
15 -
 16
16 -
 17
17 -
 18
18 -
 19
19 -
 20
20 -
 21
21 -
 22
22 -
 23
23 -
 24
24 -
25
-
26
-
27
-
28
-
29
-
30
-
31
-
32
-
33
-
34
-
35
-
36
-
37
-
38
-
39
-
40
 |
 |