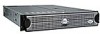
Dell PowerEdge 2550 Rack Installation Guide - Page 32
Installing the Slide Assemblies in the Rack
 |
View all Dell PowerEdge 2550 manuals
Add to My Manuals
Save this manual to your list of manuals |
Page 32 highlights
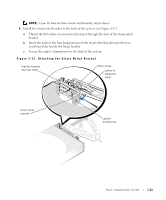
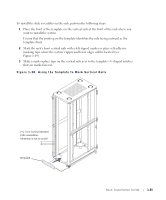
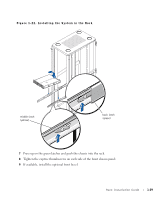
www.dell.com | support.dell.com Installing the Slide Assemblies in the Rack NOTE: If Dell installed the slide assemblies, you can skip this section. 1 At the front of the rack cabinet, position one of the slide assemblies so that its mounting bracket flange fits between the marks or tape you placed on the rack, marking the upper and lower edges of the template (see Figure 1-19). 2 The hooks on the mounting bracket should align with the marks you made from the V-shaped notches in the template. 3 Align the slide-assembly mounting-bracket flange (on the front of the slide assembly) with the square holes in the front vertical rail (see Figure 1-20). 4 Push forward until the mounting tabs are secure in the square holes on the vertical rail and the push-button clicks and pops out. 5 Push back on the back slide assembly mounting bracket flange until the mounting tabs lock into the square holes on the back vertical rail. 6 Repeat steps 1 through 7 for the remaining slide assembly on the other side of the rack. 1-26 Rack Installation Guide
-
 1
1 -
2
-
3
-
4
-
5
-
6
-
7
-
8
-
9
-
10
-
11
-
12
-
13
-
14
-
15
-
16
-
17
-
18
-
19
-
20
-
21
-
22
-
23
-
24
-
25
-
26
-
 27
27 -
 28
28 -
 29
29 -
 30
30 -
 31
31 -
 32
32 -
 33
33 -
 34
34 -
 35
35 -
 36
36 -
 37
37 -
38
-
39
-
40
 |
 |
