Dell PowerEdge 2550 Rack Installation Guide - Page 27
matching holes beside the hinge bracket.
 |
View all Dell PowerEdge 2550 manuals
Add to My Manuals
Save this manual to your list of manuals |
Page 27 highlights
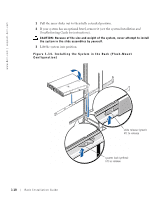
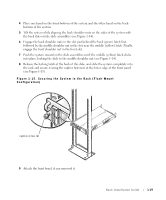
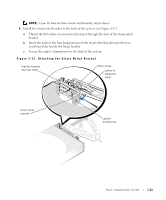
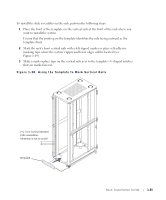
NOTE: If your kit does not have a strain-relief bracket, skip to step 6. 6 Install the strain-relief bracket to the back of the system (see Figure 1-17): a Thread the I/O cables you connected in step 4 through the slots of the strain-relief bracket. b Insert the ends of the four long portions of the strain-relief bracket into the four matching holes beside the hinge bracket. c Secure the captive thumbscrew to the back of the system. Figure 1-17. Attaching the Strain Relief Bracket bracket inserted into four holes Velcro strap cables to expansion cards strain-relief bracket captive thumbscrew Rack Installation Guide 1-21
-
 1
1 -
2
-
3
-
4
-
5
-
6
-
7
-
8
-
9
-
10
-
11
-
12
-
13
-
14
-
15
-
16
-
17
-
18
-
19
-
20
-
21
-
 22
22 -
 23
23 -
 24
24 -
 25
25 -
 26
26 -
 27
27 -
 28
28 -
 29
29 -
 30
30 -
 31
31 -
 32
32 -
33
-
34
-
35
-
36
-
37
-
38
-
39
-
40
 |
 |

Rack Installation Guide
1-21
NOTE:
If your kit does not have a strain-relief bracket, skip to step 6.
6
Install the strain-relief bracket to the back of the system (see Figure 1-17):
a
Thread the I/O cables you connected in step 4 through the slots of the strain-relief
bracket.
b
Insert the ends of the four long portions of the strain-relief bracket into the four
matching holes beside the hinge bracket.
c
Secure the captive thumbscrew to the back of the system.
Figure 1-17. Attaching the Strain Relief Bracket
bracket inserted
into four holes
strain-relief
bracket
captive
thumbscrew
Velcro strap
cables to
expansion
cards