Dell PowerEdge 2550 Rack Installation Guide - Page 14
the center-mount bracket see
 |
View all Dell PowerEdge 2550 manuals
Add to My Manuals
Save this manual to your list of manuals |
Page 14 highlights
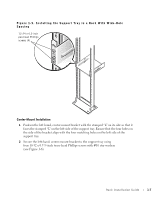
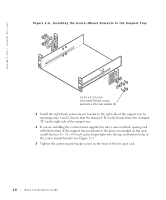
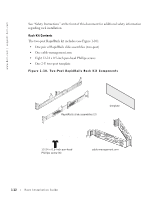
www.dell.com | support.dell.com Figure 1-6. Installing the Center-Mount Brackets to the Support Tray L R 10-32 x 0.375-inch truss-head Phillips screws, eachwith a #10 star washer (4) 3 Install the right-hand, center-mount bracket to the right side of the support tray by repeating steps 1 and 2. Ensure that the stamped "R" on the bracket faces the stamped "R" on the right side of the support tray. 4 If you are installing the center-mount support tray into a universal-hole spacing rack with the bottom of the support tray positioned at the place you marked on the rack, install the four 12 - 24 x 0.5-inch screws finger-tight into the top and bottom holes of the center-mount bracket (see Figure 1-7). 5 Tighten the center-mount bracket screws to the front of the two-post rack. 1-8 Rack Installation Guide
-
 1
1 -
2
-
3
-
4
-
5
-
6
-
7
-
8
-
 9
9 -
 10
10 -
 11
11 -
 12
12 -
 13
13 -
 14
14 -
 15
15 -
 16
16 -
 17
17 -
 18
18 -
 19
19 -
20
-
21
-
22
-
23
-
24
-
25
-
26
-
27
-
28
-
29
-
30
-
31
-
32
-
33
-
34
-
35
-
36
-
37
-
38
-
39
-
40
 |
 |
