Dell PowerEdge 2550 Rack Installation Guide - Page 20
Installing the Slide Assemblies in the Rack, Center-Mount Installation
 |
View all Dell PowerEdge 2550 manuals
Add to My Manuals
Save this manual to your list of manuals |
Page 20 highlights
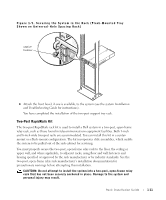
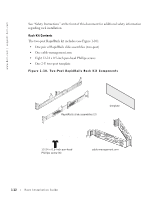
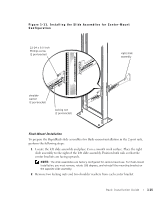
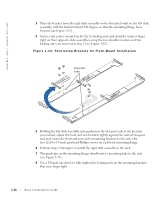
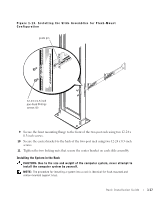
www.dell.com | support.dell.com 5 If your rack has wide hole spacing (see Figure 1-3), mark the lower and middle mounting positions on the vertical rails as shown by the bottom and middle V-notches on the sides of the template. Each 1-U (1.75-inch) vertical space on a rack with wide hole spacing has two holes with center-to-center spacing between holes (beginning at the top of a 1-U space) of 1.25 inches (see Figure 1-3). Installing the Slide Assemblies in the Rack You can install the slide assemblies in a 2-post open-frame rack having either universal-hole spacing (see Figure 1-2) or wide hole spacing (see Figure 1-3). You can install the 2-U RapidRails in either a flush-mount or center-mount configuration. CAUTION: The 2-U RapidRails rack kit is designed to support a single system in a 2-post open frame relay rack. Do not attempt to install any other system using this kit. Damage to the system and personal injury to you and others may result. Center-Mount Installation To prepare the RapidRails slide assemblies for center-mount installation in the 2-post rack, perform the following steps: 1 Using a 3/8-inch nut driver, loosen by one-half turn the two locking nuts that attach the center bracket to each slide assembly. 2 Center the alignment hole on the bracket with an appropriate alignment hole on each slide assembly. There is an alignment hole on each movable bracket(see Figure 1-12). 3 Position the right slide assembly in the two-post rack at the location you marked, adjust the front and rear brackets tightly against the vertical two-post rack and secure the front and rear center mounting brackets to the rack with two 12-24 x 0.5-inch pan-head Phillips screws. 4 Repeat step 3 to install the left slide assembly in the rack. 5 Using a 3/8-inch nut driver, tighten the locking nuts on the center mounting brackets of both right and left slide assemblies (see Figure 1-11). 1-14 Rack Installation Guide
-
 1
1 -
2
-
3
-
4
-
5
-
6
-
7
-
8
-
9
-
10
-
11
-
12
-
13
-
14
-
 15
15 -
 16
16 -
 17
17 -
 18
18 -
 19
19 -
 20
20 -
 21
21 -
 22
22 -
 23
23 -
 24
24 -
 25
25 -
26
-
27
-
28
-
29
-
30
-
31
-
32
-
33
-
34
-
35
-
36
-
37
-
38
-
39
-
40
 |
 |