Dell PowerEdge M820 Dell PowerEdge M820 Systems Owner's Manual - Page 31
Removing A Hard Drive/SSD, System Board Connectors.
 |
View all Dell PowerEdge M820 manuals
Add to My Manuals
Save this manual to your list of manuals |
Page 31 highlights
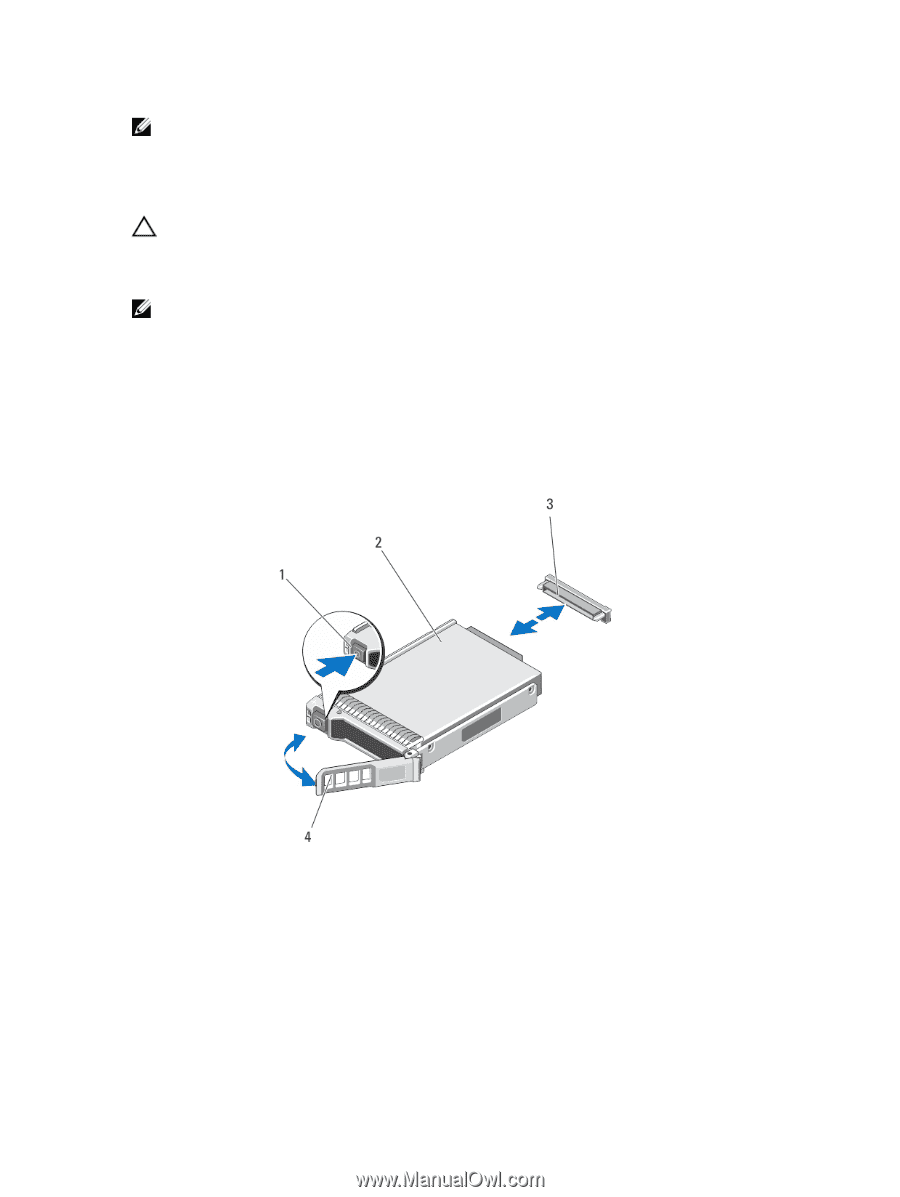
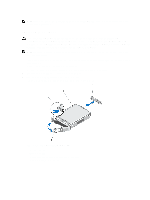
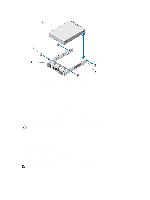
NOTE: To locate J_BP0, J_BP1, MiniPERC CARD, and the PCIe EXTENDER connectors on the system board, see System Board Connectors. Removing A Hard Drive/SSD CAUTION: Many repairs may only be done by a certified service technician. You should only perform troubleshooting and simple repairs as authorized in your product documentation, or as directed by the online or telephone service and support team. Damage due to servicing that is not authorized by Dell is not covered by your warranty. Read and follow the safety instructions that came with the product. NOTE: Not all operating systems support hot-swappable drive installation. See the documentation supplied with your operating system. 1. Take the hard drive/SSD offline and wait until the indicator codes on the drive carrier signal that the drive may be removed safely. When all indicators are off, the drive is ready for removal. See your operating system documentation for more information on taking the drive offline. 2. Open the hard-drive/SSD carrier handle to release the drive. 3. Slide the hard drive/SSD out until it is free of the drive bay. If you are permanently removing the hard drive/SSD, install a blank insert. Figure 7. Removing and Installing a Hard Drive/SSD 1. release button 2. hard drive/SSD 3. drive connector (on the hard-drive/SSD backplane) 4. hard-drive/SSD carrier handle 31
-
 1
1 -
2
-
3
-
4
-
5
-
6
-
7
-
8
-
9
-
10
-
11
-
12
-
13
-
14
-
15
-
16
-
17
-
18
-
19
-
20
-
21
-
22
-
23
-
24
-
25
-
 26
26 -
 27
27 -
 28
28 -
 29
29 -
 30
30 -
 31
31 -
 32
32 -
 33
33 -
 34
34 -
 35
35 -
 36
36 -
37
-
38
-
39
-
40
-
41
-
42
-
43
-
44
-
45
-
46
-
47
-
48
-
49
-
50
-
51
-
52
-
53
-
54
-
55
-
56
-
57
-
58
-
59
-
60
-
61
-
62
-
63
-
64
-
65
-
66
-
67
-
68
-
69
-
70
-
71
-
72
-
73
-
74
-
75
-
76
-
77
-
78
-
79
-
80
-
81
-
82
-
83
-
84
-
85
-
86
-
87
-
88
-
89
-
90
-
91
-
92
-
93
-
94
-
95
-
96
-
97
-
98
-
99
-
100
-
101
-
102
-
103
-
104
-
105
-
106
-
107
-
108
-
109
-
110
-
111
-
112
-
113
-
114
-
115
-
116
-
117
-
118
-
119
-
120
-
121
-
122
-
123
-
124
-
125
-
126
-
127
-
128
-
129
-
130
-
131
-
132
-
133
-
134
-
135
-
136
-
137
-
138
-
139
 |
 |