Dell PowerEdge T710 Hardware Owner's Manual - Page 143
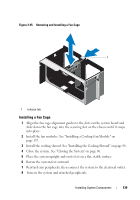
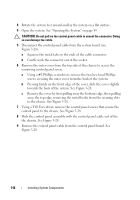
Install the fan cage. See Installing a Fan Cage on back panel.
 |
View all Dell PowerEdge T710 manuals
Add to My Manuals
Save this manual to your list of manuals |
Page 143 highlights
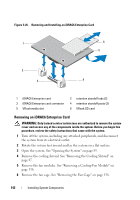
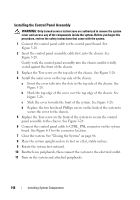
7 Remove the VFlash media card (if installed) from the iDRAC6 Enterprise card. See "Cooling Fans" on page 136. 8 If present, disconnect the Ethernet cable from the iDRAC6 Enterprise card. 9 Remove the iDRAC6 Enterprise card: a Pull back slightly on the two tabs at the front edge of the card and gently lift the front edge of the card off of the retention standoffs. As the card releases from the standoffs, the connector under the card disengages from the system board connector. b Slide the card away from the back of the system until the RJ-45 connector is clear of the back panel and then lift the card out of the system. See Figure 3-26. 10 Install the plastic filler plug for the iDRAC6 Enterprise port in the system back panel. 11 Install the fan cage. See "Installing a Fan Cage" on page 139. 12 Install the fan modules. See "Installing a Cooling-Fan Module" on page 137. 13 Install the cooling shroud. See "Installing the Cooling Shroud" on page 88. 14 Close the system. See "Closing the System" on page 86. 15 Place the system upright and on its feet on a flat, stable surface. 16 Rotate the system feet outward. 17 Reattach any peripherals and connect the system to an electrical outlet. 18 Turn on the system and attached peripherals. Installing System Components 143
-
 1
1 -
2
-
3
-
4
-
5
-
6
-
7
-
8
-
9
-
10
-
11
-
12
-
13
-
14
-
15
-
16
-
17
-
18
-
19
-
20
-
21
-
22
-
23
-
24
-
25
-
26
-
27
-
28
-
29
-
30
-
31
-
32
-
33
-
34
-
35
-
36
-
37
-
38
-
39
-
40
-
41
-
42
-
43
-
44
-
45
-
46
-
47
-
48
-
49
-
50
-
51
-
52
-
53
-
54
-
55
-
56
-
57
-
58
-
59
-
60
-
61
-
62
-
63
-
64
-
65
-
66
-
67
-
68
-
69
-
70
-
71
-
72
-
73
-
74
-
75
-
76
-
77
-
78
-
79
-
80
-
81
-
82
-
83
-
84
-
85
-
86
-
87
-
88
-
89
-
90
-
91
-
92
-
93
-
94
-
95
-
96
-
97
-
98
-
99
-
100
-
101
-
102
-
103
-
104
-
105
-
106
-
107
-
108
-
109
-
110
-
111
-
112
-
113
-
114
-
115
-
116
-
117
-
118
-
119
-
120
-
121
-
122
-
123
-
124
-
125
-
126
-
127
-
128
-
129
-
130
-
131
-
132
-
133
-
134
-
135
-
136
-
137
-
 138
138 -
 139
139 -
 140
140 -
 141
141 -
 142
142 -
 143
143 -
 144
144 -
 145
145 -
 146
146 -
 147
147 -
 148
148 -
149
-
150
-
151
-
152
-
153
-
154
-
155
-
156
-
157
-
158
-
159
-
160
-
161
-
162
-
163
-
164
-
165
-
166
-
167
-
168
-
169
-
170
-
171
-
172
-
173
-
174
-
175
-
176
-
177
-
178
-
179
-
180
-
181
-
182
-
183
-
184
-
185
-
186
-
187
-
188
-
189
-
190
-
191
-
192
-
193
-
194
-
195
-
196
-
197
-
198
-
199
-
200
-
201
-
202
-
203
-
204
-
205
-
206
-
207
-
208
-
209
-
210
-
211
-
212
-
213
-
214
 |
 |