Dell PowerSwitch S4820T Installing the S4820T System - Page 39
Connecting the Stacking Ports (Optional), Important Points to Remember, Stack Group 1 - Ports 4 to 7
 |
View all Dell PowerSwitch S4820T manuals
Add to My Manuals
Save this manual to your list of manuals |
Page 39 highlights
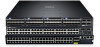
8 Connecting the Stacking Ports (Optional) Before you make your stacking port connections, rack-mount the systems or insert them into a cabinet. NOTE: You can stack up to six S4820T switches. You cannot stack the S4820T system with other SSeries systems. 1. Insert one end of the cable into a configured port. 2. Insert the other end of the cable into a similarly configured port of the adjacent system. There are no unique stacking ports; you can configure the RJ-45 and QSFP+ ports to act as stacking ports. The RJ-45 ports are labeled 0 to 47. The lower QSFP+ ports are labeled 48 and 56. The upper QSFP+ ports are labeled 52 and 60. NOTE: Data center bridging (DCB) is not supported if you use ports 0 to 47 for stacking. Important Points to Remember When stacking the S4820T, ensure that: • You configure data ports as stacking ports in predefined stacking groups of 40G (four 10G ports or one 40G port). • When you assign a stack-group number, you configure the ports associated with that group as stacking ports (refer to the following figure): - Stack Group 0 - Ports 0 to 3 - Stack Group 1 - Ports 4 to 7 - Stack Group 2 - Ports 8 to 11 - ... - Stack Group 11 - Ports 44 to 47 - Stack Group 12 - Port 48 - Stack Group 13 - Port 52 - Stack Group 14 - Port 56 - Stack Group 15 - Port 60 Connecting the Stacking Ports (Optional) 39
-
 1
1 -
2
-
3
-
4
-
5
-
6
-
7
-
8
-
9
-
10
-
11
-
12
-
13
-
14
-
15
-
16
-
17
-
18
-
19
-
20
-
21
-
22
-
23
-
24
-
25
-
26
-
27
-
28
-
29
-
30
-
31
-
32
-
33
-
 34
34 -
 35
35 -
 36
36 -
 37
37 -
 38
38 -
 39
39 -
 40
40 -
 41
41 -
 42
42 -
 43
43 -
 44
44 -
45
-
46
-
47
-
48
-
49
-
50
-
51
-
52
-
53
-
54
-
55
-
56
-
57
-
58
-
59
 |
 |
