Dell PowerSwitch S4820T Installing the S4820T System - Page 45
Console Ports, Accessing the RJ-45 Console Port (RS-232), RJ-45 Console Port top and External Ethernet
 |
View all Dell PowerSwitch S4820T manuals
Add to My Manuals
Save this manual to your list of manuals |
Page 45 highlights
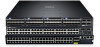
9 Console Ports You can access the S4820T directly through the console port at the input/output (I/O) side of the system. Accessing the RJ-45 Console Port (RS-232) The RS-232/RJ-45 console port is labeled on the PSU-side of the S8420T chassis (the I/O side), as shown in the following figure. Figure 12. Console Port 1. RJ-45 Console Port (top) and External Ethernet Management Port (bottom) NOTE: Before starting this procedure, have a terminal emulation program already installed on your PC. The following table lists the console port pinout assignments. NOTE: If your PC's serial port cannot accept a female DB-9 connector, acquire a DB-9 male-tomale adaptor. To access the console port, follow these steps. 1. Install an RJ-45 copper cable into the console port. To connect the S4820T console port to a terminal server, use a rollover cable. 2. Connect the other end of the cable to the dumb terminal emulator (DTE) server. 3. Keep the default terminal settings on the console as follows: • 9600 baud rate • No parity • 8 data bits • 1 stop bit • No flow control Console Ports 45
-
 1
1 -
2
-
3
-
4
-
5
-
6
-
7
-
8
-
9
-
10
-
11
-
12
-
13
-
14
-
15
-
16
-
17
-
18
-
19
-
20
-
21
-
22
-
23
-
24
-
25
-
26
-
27
-
28
-
29
-
30
-
31
-
32
-
33
-
34
-
35
-
36
-
37
-
38
-
39
-
 40
40 -
 41
41 -
 42
42 -
 43
43 -
 44
44 -
 45
45 -
 46
46 -
 47
47 -
 48
48 -
 49
49 -
 50
50 -
51
-
52
-
53
-
54
-
55
-
56
-
57
-
58
-
59
 |
 |
