Dell PowerVault 100T DAT72 User's Guide - Page 27
Using the Tape Drive, Operating the Drive - cleaning tape
 |
View all Dell PowerVault 100T DAT72 manuals
Add to My Manuals
Save this manual to your list of manuals |
Page 27 highlights
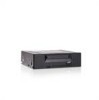
Chapter 3. Using the Tape Drive v "Operating the Drive" v "Loading, Unloading, and Write-Protecting Cartridges" on page 3-2 v "Caring for Tape Cartridges" on page 3-5 v "Cleaning the Tape Mechanism" on page 3-7 Operating the Drive Turn on the external drive by pushing the power on/off button on the front panel (Figure 3-1). Turn on the rack mount drive by pushing the power on/off button on the front panel (Figure 3-2).The tape drive runs its Power-On Self-Test (POST). At the end of the hardware self-test, the ready/activity LED must be solid green. 1 a80hd030 Figure 3-1. Turning on the External Drive 1 Power On/Off Button Figure 3-2. Turning on the Rack Mount Drive Resetting the Drive You can reset the drive without powering off the drive and system. This may be necessary if the drive stops responding. To do this, press and hold the eject button on the front panel of the tape drive for 10 seconds (Figure 3-3 on page 3-2). The drive forces a dump of vital technical data to drive memory and overwrites the existing dump. The drive then reboots to allow communication. 3-1
-
 1
1 -
2
-
3
-
4
-
5
-
6
-
7
-
8
-
9
-
10
-
11
-
12
-
13
-
14
-
15
-
16
-
17
-
18
-
19
-
20
-
21
-
 22
22 -
 23
23 -
 24
24 -
 25
25 -
 26
26 -
 27
27 -
 28
28 -
 29
29 -
 30
30 -
 31
31 -
 32
32 -
33
-
34
-
35
-
36
-
37
-
38
-
39
-
40
-
41
-
42
-
43
-
44
-
45
-
46
-
47
-
48
-
49
-
50
-
51
-
52
-
53
-
54
-
55
-
56
-
57
-
58
-
59
-
60
-
61
-
62
-
63
-
64
-
65
-
66
-
67
-
68
-
69
-
70
-
71
-
72
-
73
-
74
-
75
-
76
-
77
-
78
-
79
-
80
-
81
-
82
-
83
-
84
-
85
-
86
-
87
-
88
-
89
-
90
-
91
-
92
-
93
 |
 |
