Dell Powerconnect W-ClearPass Hardware Appliances W-ClearPass Guest 6.0 Deploy - Page 177
Editing the Default Self-Registration Form Settings, Creating a Single Password for Multiple Accounts
 |
View all Dell Powerconnect W-ClearPass Hardware Appliances manuals
Add to My Manuals
Save this manual to your list of manuals |
Page 177 highlights
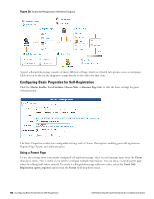
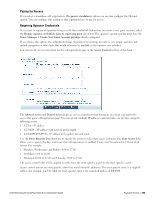
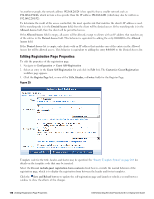
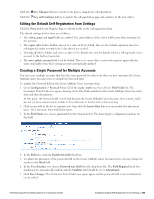
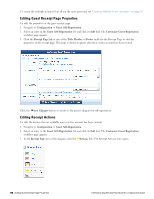
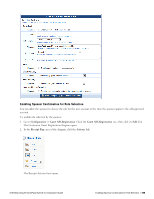
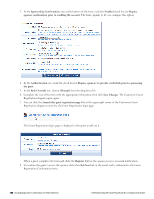
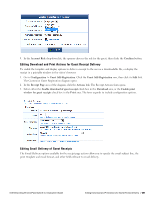
Click the Save Changes button to return to the process diagram for self-registration. Click the Save and Continue button to update the self-registration page and continue to the next editor. Editing the Default Self-Registration Form Settings Click the Form link for the Register Page to edit the fields on the self-registration form. The default settings for this form are as follows: l The visitor_name and email fields are enabled. The email address of the visitor will become their username for the network. l The expire_after field is hidden, and set to a value of 24 by default; this sets the default expiration time for a self-registered visitor account to be 1 day after it was created. l The role_id field is hidden, and set to a value of 2 by default; this sets the default role for a self-registered visitor account to the built-in Guest role. l The auto_update_account field is set by default. This is to ensure that a visitor who registers again with the same email address has their existing account automatically updated. Creating a Single Password for Multiple Accounts You can create multiple accounts that have the same password. In order to do this, you first customize the Create Multiple Guest Accounts form to include the Password field. To include the Password field on the Create Multiple Guest Accounts form: 1. Go to Configuration > Forms & Views. Click the create_multi row, then click its Edit Fields link. The Customize Form Fields view opens, showing a list of the fields included in the Create Multiple Guest Accounts form and their descriptions. At this point, the Password field is not listed because the Create Multiple Guest Accounts form (create_multi) has not yet been customized to include it. You will create it for the form in the next step. 2. Click on any field in the list to expand a row, then click the Insert After link (you can modify this placement later). The Customize Form Field form opens. 3. In the Field Name row, choose password from the drop-down list. The form displays configuration options for this field. 4. In the Field row, mark the Enable this field check box. 5. To adjust the placement of the password field on the Create Multiple Guest Accounts form, you may change the number in the Rank field. 6. In the User Interface row, choose Password text field from the drop-down list. The Field Required check box should now be automatically marked, and the Validator field should be set to IsNonEmpty. 7. Click Save Changes. The Customize Form Fields view opens again, and the password field is now included and can be edited. Dell Networking W-ClearPass Guest 6.0 | Deployment Guide Editing the Default Self-Registration Form Settings | 177
-
 1
1 -
2
-
3
-
4
-
5
-
6
-
7
-
8
-
9
-
10
-
11
-
12
-
13
-
14
-
15
-
16
-
17
-
18
-
19
-
20
-
21
-
22
-
23
-
24
-
25
-
26
-
27
-
28
-
29
-
30
-
31
-
32
-
33
-
34
-
35
-
36
-
37
-
38
-
39
-
40
-
41
-
42
-
43
-
44
-
45
-
46
-
47
-
48
-
49
-
50
-
51
-
52
-
53
-
54
-
55
-
56
-
57
-
58
-
59
-
60
-
61
-
62
-
63
-
64
-
65
-
66
-
67
-
68
-
69
-
70
-
71
-
72
-
73
-
74
-
75
-
76
-
77
-
78
-
79
-
80
-
81
-
82
-
83
-
84
-
85
-
86
-
87
-
88
-
89
-
90
-
91
-
92
-
93
-
94
-
95
-
96
-
97
-
98
-
99
-
100
-
101
-
102
-
103
-
104
-
105
-
106
-
107
-
108
-
109
-
110
-
111
-
112
-
113
-
114
-
115
-
116
-
117
-
118
-
119
-
120
-
121
-
122
-
123
-
124
-
125
-
126
-
127
-
128
-
129
-
130
-
131
-
132
-
133
-
134
-
135
-
136
-
137
-
138
-
139
-
140
-
141
-
142
-
143
-
144
-
145
-
146
-
147
-
148
-
149
-
150
-
151
-
152
-
153
-
154
-
155
-
156
-
157
-
158
-
159
-
160
-
161
-
162
-
163
-
164
-
165
-
166
-
167
-
168
-
169
-
170
-
171
-
 172
172 -
 173
173 -
 174
174 -
 175
175 -
 176
176 -
 177
177 -
 178
178 -
 179
179 -
 180
180 -
 181
181 -
 182
182 -
183
-
184
-
185
-
186
-
187
-
188
-
189
-
190
-
191
-
192
-
193
-
194
-
195
-
196
-
197
-
198
-
199
-
200
-
201
-
202
-
203
-
204
-
205
-
206
-
207
-
208
-
209
-
210
-
211
-
212
-
213
-
214
-
215
-
216
-
217
-
218
-
219
-
220
-
221
-
222
-
223
-
224
-
225
-
226
-
227
-
228
-
229
-
230
-
231
-
232
-
233
-
234
-
235
-
236
-
237
-
238
-
239
-
240
-
241
-
242
-
243
-
244
-
245
-
246
-
247
-
248
-
249
-
250
-
251
-
252
-
253
-
254
-
255
-
256
-
257
-
258
-
259
-
260
-
261
-
262
-
263
-
264
-
265
-
266
-
267
-
268
-
269
-
270
-
271
-
272
-
273
-
274
-
275
-
276
-
277
-
278
-
279
-
280
-
281
-
282
-
283
-
284
-
285
-
286
-
287
-
288
-
289
-
290
-
291
-
292
-
293
-
294
-
295
-
296
-
297
-
298
-
299
-
300
-
301
-
302
-
303
-
304
-
305
-
306
-
307
-
308
-
309
-
310
-
311
-
312
-
313
-
314
-
315
-
316
-
317
-
318
-
319
-
320
 |
 |