Dell S3048-ON EMC Solutions for Microsoft Azure Stack HCI Networking Guide - Page 18
Data Center Bridging DCB Settings, Disabled., Back > Finish > Yes, System Setup - manual
 |
View all Dell S3048-ON manuals
Add to My Manuals
Save this manual to your list of manuals |
Page 18 highlights
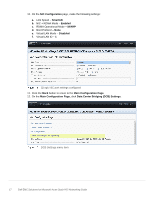
13. On the Data Center Bridging (DCB) Settings page, ensure the DCBX Protocol feature is set to Disabled. DCBX Protocol setting Note: DCBx is a protocol used to exchange PFC and ETS configuration details between devices, such as a switch and a network adapter. DCBx is not used in this deployment because Microsoft recommends disabling it for S2D deployments. ETS and PFC settings are configured manually on the switch and the network adapter later in this guide. 14. Click Back > Finish > Yes (to save the changes if applicable) > OK (to acknowledge the change success message if applicable). Repeat steps 5-14 above for the 2nd QLogic QL41262 adapter port. 15. When complete, exit System Setup and reboot the system. 18 Dell EMC Solutions for Microsoft Azure Stack HCI Networking Guide
-
 1
1 -
2
-
3
-
4
-
5
-
6
-
7
-
8
-
9
-
10
-
11
-
12
-
 13
13 -
 14
14 -
 15
15 -
 16
16 -
 17
17 -
 18
18 -
 19
19 -
 20
20 -
 21
21 -
 22
22 -
 23
23 -
24
-
25
-
26
-
27
-
28
-
29
-
30
-
31
-
32
-
33
-
34
-
35
-
36
-
37
-
38
-
39
-
40
-
41
-
42
-
43
-
44
-
45
-
46
-
47
-
48
-
49
-
50
-
51
-
52
-
53
-
54
-
55
-
56
-
57
-
58
-
59
-
60
-
61
-
62
-
63
 |
 |
